Walls:
- But supposing the intruder has made it to the building line. We will come to openings and roofs next, but how strong is what they are attached to?
- Internal walls, saferooms and bunkers are dealt with separately later.
- Walls:
- Tips
- Service penetrations
- Threats
Tips
- Security against manual attack, bullets and explosions begins at 4” reinforced concrete. With only brick, whilst it will stop most bullets, you can buy doors and windows stronger than brick, and reinforcement (eg plywood and steel plate or mesh) is recommended against multiple strikes or spalling or collapse and to delay attackers smashing a hole for firearms or bombs.
- Avoid attracting attention by leaving unusual security features visible.
- To add wall thickness, it is easier to build an extra layer outside where you can get to foundations, rather than build a backing wall inside or lining the existing wall – which means moving out and awkward cutouts for services.
Service penetrations
- Penetrations for utilities need attention to the surrounding facade to prevent them being an easy starting point for widening a hole.
- Maximum penetration size should be 96 square inches, or if too long to climb through they can be up to 144 square inches.
- Use steep upward conduit with tight bends to make it hard to feed anything through, and fit a steel collar to stop the penetration acting as a handy pre-made drill hole reading for cutting.
- Roof mounted ventilation may leave a penetration if unbolted, in which case it needs grilles underneath or even a high security penthouse machinery housing.
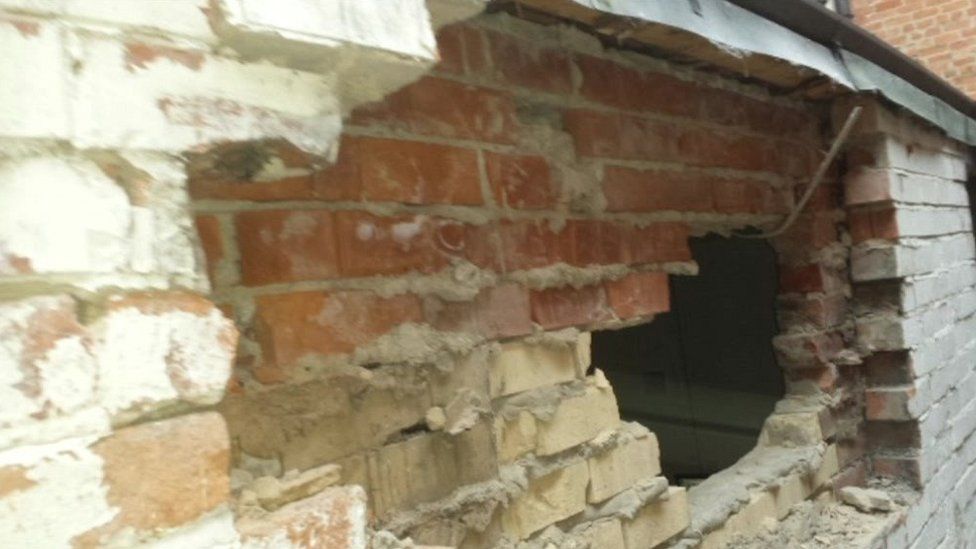
- Burglars used a vent as a starting point to sledgehammer a hole only two bricks wide to do a shop in Dudley.
- You need to think about meters, utilities and vents; unfortunately the products to protect them tend to be big and commercial.
- Sewers need inlet grilles to prevent security grilles clogging.
- Man-passable penetrations for utilities, whether pipes or crawl spaces, need:
- Padlocks on grilles or manhole covers are too easy to cut off.
- grilles of 0.5” steel bars in 3” squares, or
- equivalent such as:
- 9mm steel perforated plate with welded bolt heads,
- 5mm thick x 25mm deep steel grating 6” wider than the opening on each side fixed with 0.5”x5.5” concrete anchor bolts,
- cluster of small pipes blocking one large sewer, or
- 60cm steel pipe through the wall welded to 3mm steel inside and filled with seven smaller pipes of maximum 10” diameter,
- and for high risk scenario, seismic sensors and 15.9mm bars.


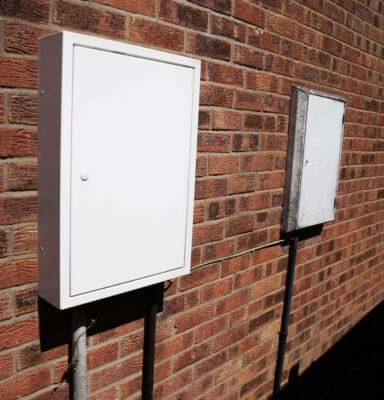
Meter boxes
- Locate utility meters hidden out back, failing which leave them visible out front, but remember anyone can switch you off from outside.
- There are no insurance rated specific meter covers, but if you really want to seal off your meter then you could try to get hold of something like an infrastructure cabinet from EJ (Defenso wall mounted) or Technocover (CB1/IS7/DV3 UltraSecure Single Door Cabinet) etc rated SR2 to SR4. In reality they are almost certainly too big, ugly and expensive, but if looks are not important and money is no object then they will be great bolted to a concrete wall.
- Anti-vandal steel covers still use the standard triangular key, so are only to stop casual yobs not intruders and saboteurs. But for £80-90 you can at least replace covers on exposed walls with 1.2mm steel ones like MeterBox so they won’t be easily smashed. You could probably replace the cams with key operated ones.
- The compromise will probably have to be something like a:
- Mitras lockable overbox for £233 which is only aluminium (so weaker-bodied than steel anti vandal covers) but does use a safe lock, or
- Access Panel Company’s 1mm steel version which can come with radial pin tumbler or europrofile lock and costs £150 for a 60cm square size for example.
- Hatches can be given anti-tamper stickers.


Fans
- You can replace extractor fans with the SBD rated Greenwood Omnique OF100GIP for £165 which clamps on glass with bolts, although would be even better on polycarbonate.
Threats
Manual attack
Key points
- To have any chance of keeping determined professionals with time on their side out of a home, you need either reinforced concrete or to use weaker fabric like brickwork for loadbearing and instead turn the home or a room into a strongroom inside that with separate materials.
- Think how to mitigate flat roofs and balconies that help climbing.
- The building line should ideally be set back a hundred feet from the boundary. At a minimum it should be 14’ back to avoid intruders reaching upper floor windows from fences.
Threat level
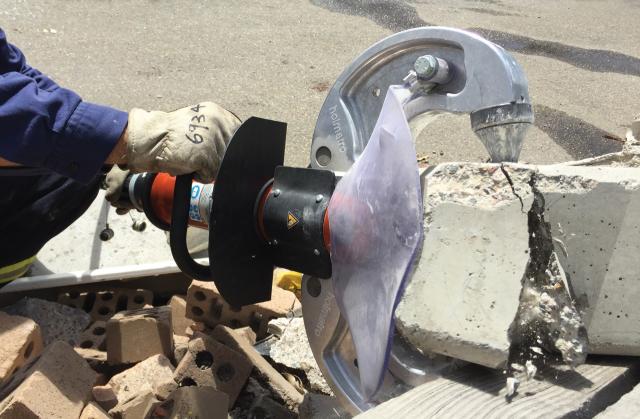
- You might ask yourself if you really need to stop a concrete saw or rescue tools like hydraulic chisels that munch through bricks and sheet metal. Perhaps consider whether you could realistically be targeted by the equivalent of state actors with tactical gear like the Holmatro CC23 11t rated concrete crusher. You cannot specify a wall until you know what someone might realistically come at it with.
- Government do not have enough gadgets or trained operators to come after everyone. For example Essex Police have to share a drone with Kent, although have their own IMSI catcher. Anything sexier than that is shared between forces via ROCA or obtained through NCA who can call upon and work with (eg JOT) intelligence services who have domestic crime prevention remits. However, if you still fear being targeted by state actors or equivalent, perhaps in a Waco-style siege, then you should familiarise yourself with proprietary technology as a guide to their minimum capabilities. Security services have their own and shared labs such as DSTL at Porton Down, who may produce next generation gear, for example MI5 came up with Weeping Angel TV camera hacking.
- Check out the market through ADS members, through-wall surveillance products like:
- Acustek’s CPR4+ radar which can detect you 5 metres through the wall,
- ACU-LND silent drill,
- UDV Scorpion under door viewer (which needs 3.5mm clearance), and
- STS stereo stethoscope.


Material choices
- If you were building new and disliked the brittleness of bricks, then you would use steel reinforced engineering bricks or concrete blocks. That would make getting in extremely hard, although would not stop a quick hand hole – for that you would ideally install exmesh both sides. But even the exmesh would not give reinforced brickwork an SR4 equivalence, as firstly, stopping a hole does not stop an SR4 door frame being ripped out from vulnerable edges and secondly, exmesh is not rated SR4 even in combination with anything.
- Brick is about eight times weaker than concrete against attack if measured by tensile strength. Even worse, it is held together by mortar so snaps along the bonds, and 30% of a brick wall with 0.5″ joints is mortar.
- To get maximum benefit from brick walls, the typical home needs them to be lined with up to 9 gauge exmesh, 3mm or 6mm steel, or 3mmsteel / 18mm plywood / 3mm steel sandwich.

- Reinforced concrete benefits more from thickness, with each extra inch providing more delay than the previous inch, as it becomes harder to use tools.
- Composites work best. For example, instead of needing over 4 feet of reinforced concrete to stop a level 5 hand, power and thermal tool and explosive attack for 30 minutes, you can use 18” with exmesh reinforcement and 0.25” steel lining.
- If you build a strongroom and want walls no thicker than about 12″, tests show the strongest combination is 8″ grouted CMU backed by 4″ steel reinforced concrete, lasting about 25 mins against a gang with tools like a sledgehammer. Remember they could make a handhole to threaten you with a gun faster than that.
- If masonry is not an option then your best bet for extended delay against extended range of tools is probably a stud wall, faced on the protected side with a sandwich of 18mm plywood itself faced each side with 3mm steel, ideally hardened, although of course the fixings need to stand up to same abuse and you don’t want the studs being cut so a similar sandwich on the attack face would be even better.
- The entry level product for stud walls is Etex Siniat‘s Securtex to SR1 which builds in fibreglass to 15mm 13.5kg/m2 plasterboard, screwed on steels studs at 300mm centres under another layer of plasterboard, although is only rated for 85kg breaking strength but has the highest non-security rating, severe, for partition strength to BS3234 which only certifies it needs 30Nm to make a hole with a 50mm 3kg steel sphere swinging 1m.
- A leading product in wall reinforcement is Exmesh Securilath which comes in SR1 (‘MD1’), and rather more useful SR2 (‘HD1’) and SR3 (‘Ultra’) options which require adding to a stud wall attack face faced with 19mm plywood for MD1 or HD1, or adding to a stud wall both sides faced with 19mm plywood / or adding to a block wall for Ultra.
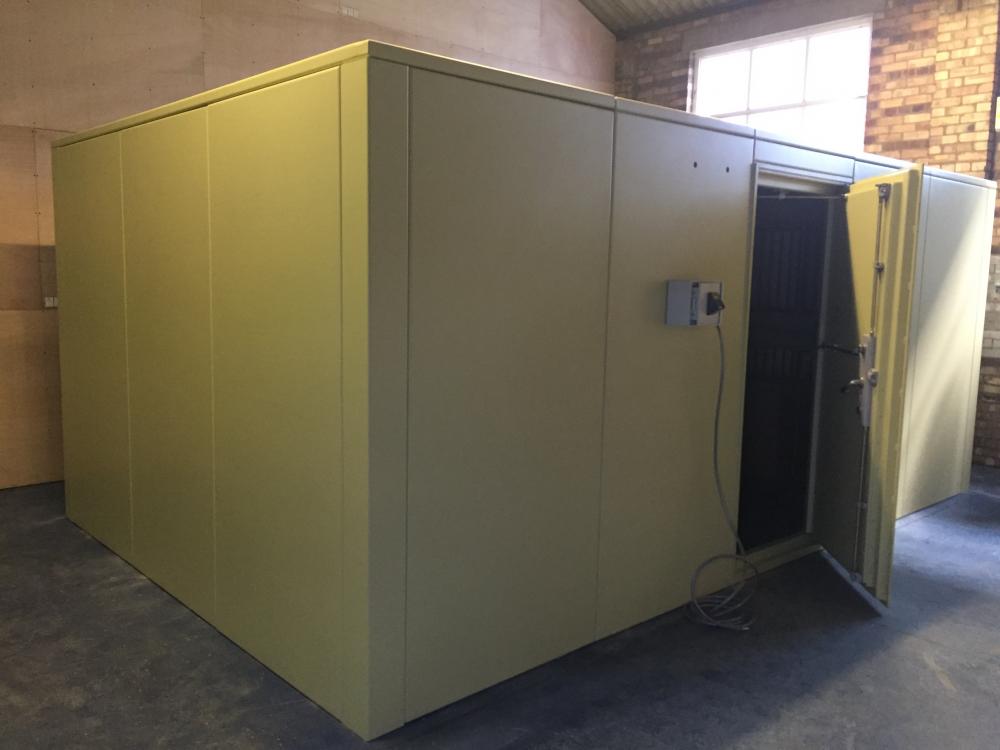
- There are no UK insurance rated wall reinforcements, but you can use EN1627 products like Alux Sikringsmodul Safe Pro up to RC5 (also for ceilings and roofs), otherwise if you need a saferoom inside stronger than your facade then you would buy a modular wall rated SR4 to SR6 such as:
- R&S Sheetmetal Security Evo VI (SR6).
- BastionWall SR4/SR5 with Protean anti cut liner, Multithreat Prime 20 to E20, Multitreat Prime 15 to E15, Multithreat Prime 10 to E10, Multithreat Prime 5 to E5, Multithreat Lite 10 to SR4, Multithreat Lite 5 to D5, Multithreat Lite 3 to E3, Multithreat Lite 1 to E1.
- Remtech Modusec up to SR5 made of steel-coated chipboard and foam.
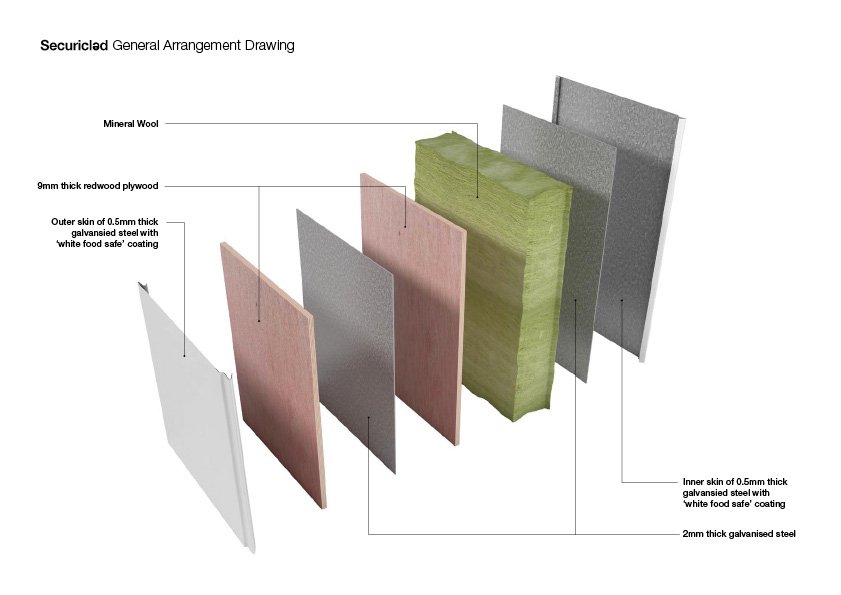
- Securiclad to SR5, Protecticlad 100mm is NPSA MTAS 1.0 & MFES. Typical makeup of 0.5mm steel skins covering attack face sandwich of 2 x 9mm redwood plywood & 2mm steel protecting mineral wall & protected face of 2mm steel. SR2 is single plywood & single steel core. SR3 adds steel other side of plywood core. SR4 adds second plywood to core. SR5 adds second steel to core.
- Warrior Screen (SR4).
- Safetell Citiwall to SR4.
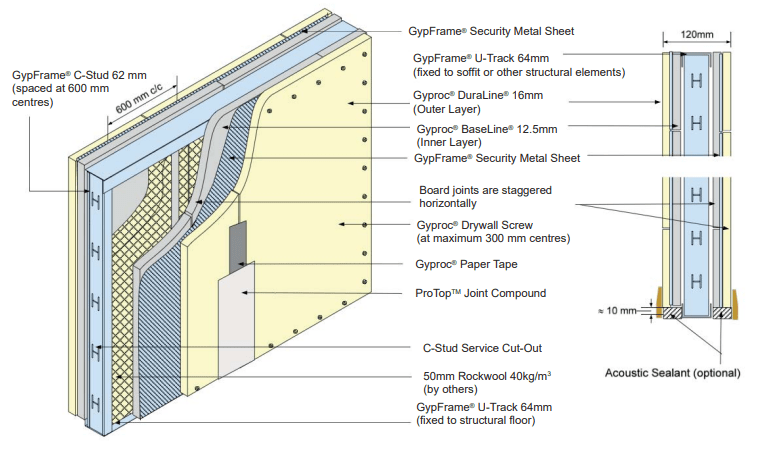
- Gypwall Secure Essential to SR2 or Gypwall Secure Advance to SR3, both for concrete substrate). 70-120mm thick stud wall of Gypframe 64mm zincalume steel U-tracks & 62mm C-studs, 50mm rockwool in cavity. SR3 uses 2 x 12.5-16mm Gyproc Habito / Duraline Plus board attack face, plus 2.5mm steel on protected side or 1.5mm steel each side. SR2 uses 1mm steel each side instead of 1.5mm. Other versions include Gypframe corrugated security metal sheet in cavity between sandwich each side of 0.7mm steel between 16mm outer sheet & 12mm inner sheet.
- TS Designs Partition Walling up to SR2/3 & SBD, 45mm thick, 45kg/m2, 1.2mm low carbon mild Magnelis steel or stainless steel face, honeycomb & mineral wool core with steel reinforcement, 1.5mm steel frame.


- You can reinforce walls against cutting using Avertic Armour panels.
Standards
- Few homes have security standard walls, as even concrete has the wrong reinforcement and brickwork is too thin as it usually has cavity insulation between two layers or is too weak as it is not interbonded or lined. However, most masonry walls come close or can be lined to come up to roughly to an LPS1175 C3 standard compared to security doors and windows. So you can assume that normal brick walls can withstand C group tools (eg 1.5kg 14″ hand axe, 10″ brick bolster, 10″ cold chisel, 3lb foot long hammer) for a couple of minutes to give you time to react. Whether the 8″ masonry is split in half by a cavity or not, it is still either a case of hammering one layer against another, which is not easy, or having to pull out the first layer as it gets stuck in the cavity, which takes time. Group A tools would take nigh on forever to come through brick as the only ones any use against it would be bashing the punch or screwdriver with the crowbar to remove a course then use the crowbar to help gravity do the rest. Group B tools add a hammer, scaffold tubing and 3.6V drill which would save some minutes but still allow a long response time. Group C is much more dangerous to brick as it adds a brick bolster, cold chisel, heavier hammer, longer crowbar and 12V drill allowing entry after as little as 3 minutes, depending if they know what they are doing.
- We can estimate that despite 8” brick counting as capable of holding a SR3 door, it will only last about 1 minute against a sledgehammer, so apart from the advantage of a stronger door against intruders expecting to attack the door, an SR3 door may well be wasted on what is effectively an SR2 wall, especially if the wall has no security liner and your door has sledgehammer resistance (some SR3 doors would achieve a short D rating). For example, in a video of the Teckentrup 62 Secure 3 at 2m20s you see it laugh off a C group lump hammer but then at 2m41s it also shrugs off a D group sledgehammer. It would not necessarily survive all D group tools for several minutes, some of which are for safecracking, like steel wedges, sledgehammer, bigger axe, bigger scaffold tube, grinder and hoolie), to cut, level, gap and smash through.
- Military standards say brickwork takes two minutes to come through with heavy tools or 3.5 minutes even if you reinforce it with steel mesh and plywood lining. However, you can’t really compare military medium threat level with an LPS 1775 rating, as military tool groups use some tools from each of LPS 1175 tool groups D-H (grinder, hoolie & sledgehammer from group D, circular saw from group E, rotahammer, cutting maul & pinch bar from group F, chainsaw & enforcer from group G, thermal lance, concrete chainsaw, rescue chainsaw & ring saw from group H) and goes beyond the maximum the MoD normally require, which is SR4.
- That an intruder with only hand tools which can be tucked in their belt can come through a masonry cavity wall in three minutes should make you stop and think about how you would repel such an attack, which can render all but the most formidable of security doors irrelevant, leaving you with potential structural damage and a hole that is hard to resecure. The fragility of normal walls underlines the need for guns and guards (and maybe alarms for deep sleepers). It can also be a justification for a saferoom rather than moving home or trashing your whole home to reinforce walls.
- Whilst burglary through walls remains the domain of jewellers and phone shops in peacetime, eventually looters too will cotton on that the only way to the goodies from premises with security doors and windows, or no windows, is with a sledgehammer through the wall.
- EN1627 assumes 9″ thick brick walls are RC4 and testing has shown lightweight concrete blocks are RC2 in that fixings can be gouged out, with 4″ brick probably coming in around RC3 in that it would easily stop a hammer and crowbar for 5 minutes. So normal cavity walls are effectively RC3 with extended delay, suggesting the door to match should be either RC4 to hopefully match the wall’s delay on the same tools (eg lump hammer and battery drill for 10 mins, which the wall would struggle with), or RC3 upgraded for delay via a mob attack standard such as SD-STD-01.01 FE5 to reflect the delay of the extra leaf of the cavity wall yet avoid overengineering against tools that could come through the wall in less than the 10 mins allowed by RC4.
- A firefighting video shows a two man ram making a hole big enough for entry through hollow concrete blocks (about as strong as ‘solid’ aircrete breeze blocks) in 40s.
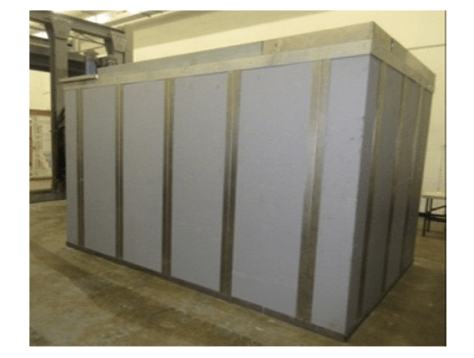
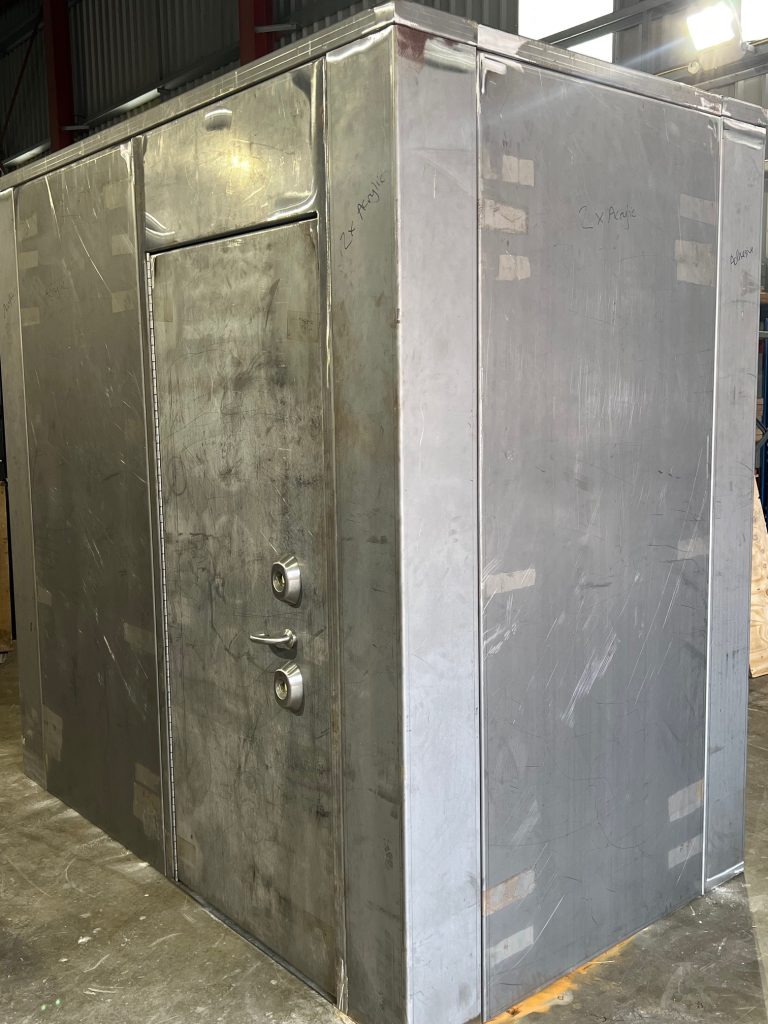
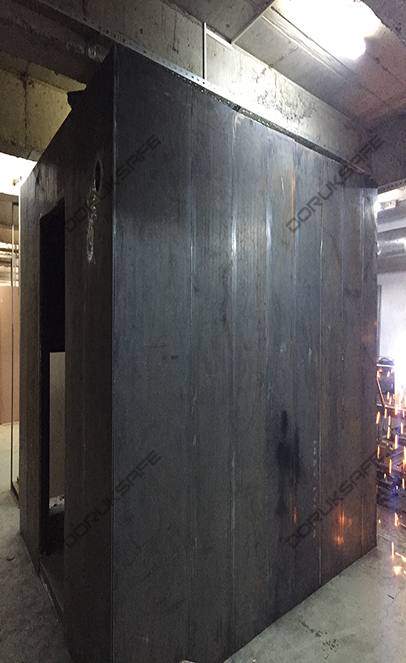
- See under Saferooms for ready-made wall panels.
- UK Building Regulations 2010 Approved Document Q only require doors and windows to be robust.
- Delay times of wall materials change when used for floor or roofs, as attacking a roof downwards is easier and attacking a floor from below is harder.
| Rating | Material |
| LPS1175 SR1 | Lightweight concrete block (RC2), 4″ brick (c. RC3), Securilath MD1, Plasterboard faced with 1″ tongue & groove (even if backed by 0.5″ plywood, or lined with 5mm steel (c. D1)) (c. SR1), 2″ planks (c. SR1, c. H1), Stud wall faced with a sandwich of 18mm plywood, 2073F (3mm x 4.4mm diamond exmesh) and plasterboard, Burton Embassy Modular E1 2mm steel tray 22kg/m2 50mm thick. |
| SR2 | 8″ brick (c. C3, c. D1), 8″ reinforced brick (c. D3), 9″ brick (RC4), 4″ + 4″ cavity wall (c. RC3 extended delay), Securilath HD1, 8″ grouted reinforced CMU (c. D1, c. SR2), 12″ ungrouted hollow CMU (c. SR2, c. D1), Stud wall faced with sandwich of 18mm plywood, 2073F (3mm x 4.4mm diamond exmesh) and plasterboard both sides, Burton Embassy Modular E2 2mm steel tray & vertical brace bars 26kg/m2 50mm thick, USA GSA Class B vault, infill panel 3mm steel attack face protecting 6mm timber (Premier Jansen 75 door) |
| SR3 | Securilath Ultra, Stone, Brickwork (for firearms security per police), 4″ reinforced concrete (c. SR3), 4″ concrete (c. SR3, c. D3), 4” concrete reinforced with 0.25” gauge 6” square mesh reinforcement (c. SR3, c. D3), 8” grouted no8 rebarred hollow concrete blocks (c. SR3, c. D3), 6” concrete reinforced with no5 rebars at 6” centres (c. SR3, c. D5), Three layers of 10 gauge (3.2mm) steel plate sandwiching two layers of 0.75” plywood (c. SR3, c. H5), Stud wall faced with double sandwich of 18mm plywood, 2073F (3mm x 4.4mm diamond exmesh) and plasterboard both sides, Burton Embassy Modular E3 3mm steel tray with extra vertical brace bars 51kg/m2 50mm thick, c. Health Canada controlled substance level 4-8 (need vault door from level 7) |
| SR4 | Warriorscreen, Safetell Citywall, Burton Talos / Embassy Modular E4 twin skin 3mm steel tray with brace bars 80kg/m2 50mm thick (FB4 uses 3mm ballistic steel instead of mild steel & adds 2kg/m2 53mm thick, extra 3mm thick, Burton also say adds 25kg/m2), 13″ brick (for firearms security per police, needs reinforcement to get anywhere near SR4 in reality), 8” concrete reinforced with two layers of 0.25” gauge 6” square mesh (c. SR4), 8″ brick lined with 2.3mm exmesh (c.SR4 but best if bricks reinforced and thicker than 9″) Three layers of 0.25” stainless steel protecting 0.5” polycarbonate backed by one layer of 10 gauge (3.1mm) low alloy steel plate (c. SR4, c. H10), Five layers of 10 gauge steel plate protecting 0.75” plywood backed by a layer of 10 gauge steel plate and another 0.75” plywood and another layer of 10 gauge steel plate (c. SR4, c. H10), Three layers of 9 gauge (3.7mm) low alloy steel plate protecting 0.75” plywood backed by one layer of 9 gauge (3.5mm) low alloy steel plate (c. SR4, c. H10), 9mm steel mesh lining a reinforced concrete wall can add 14 minutes penetration time against medium threat heavy hand and battery tools (c. SR4, c. F10), c. USA DoD SCIF vault |
| SR5 | Bastion Wall with Protean, Remtech Modusec (also CPNI option), Burton Embassy Modular E5 3mm & 4mm steel tray with hardened brace bars 88kg/m2 54mm thick, Burton Biovault E10, Stafford Bridge Hunterston E10, 12” grouted hollow concrete blocks reinforced with no6 rebar on 8” centres (c. SR5, c. D20), c. USA DoD 5100.76-M Arms Ammunition & Explosives, DoD 5210.41-M Nuclear, Health Canada controlled substance level 8, UK laboratory |
| SR6 | R&S Sheetmetal Security Evo VI, Burton Orthrus O6 27mm reinforced composite filled steel tray with brace bars 90kg/m2 (SR6 also achieves G5) / Embassy Modular E6 3mm & 4mm steel filled with 3mm exmesh & 16mm plywood with hardened brace bars 100kg/m2 54mm (FB6 uses 6mm ballistic steel instead of 4mm mild steel & adds 21kg/m2 and 2mm thickness, Burton says adds 52kg/m2 & 6mm thickness) |
| SR7 | Burton Embassy Modular C7 70mm composite-filled steel tray 210kg/m2 70mm thick |
| SR8 | Burton Embassy Modular C8 70mm anti-explosive composite filled steel tray 225kg/m2 70mm thick |
| EN1143 IV | Chubb Moduleguard 16cm steel trays filled with Chubb Borox XP |
| V | Muller Safe 2m x 2m x 3m Bunker modular saferoom to FB7 Gunnebo Centurion LW-SR |
| IX | 40cm reinforced 60MPa concrete + two rows anti core drill reinforcement Hartmann Tresor modular wall |
| X | 50cm reinforced 60MPa concrete + two rows anti core drill reinforcement |
| XI | 60cm reinforced 60MPa concrete + two rows anti core drill reinforcement Fichet-Bauche modular vault 25cm thick Gradium |
| XII | 75cm reinforced 60MPa concrete + two rows anti core drill reinforcement |
| XIII | 100cm reinforced 60MPa concrete + two rows anti core drill reinforcement Burton Cerberus up to CDEX 415mm thick & 1,215kg/m2 RU 4,500 |
Nuclear Plant Standard
- Getting the 1978 Sandia nuclear design handbook ‘A systemic approach to the conceptual design of physical protection systems for nuclear facilities’ will be a challenge. However we can view similar manuals, the 1978 Brookhaven Barrier Penetration Database, the 1981 Sandia Physical Protection Technology for Nuclear Power Plants and the 2007 Sandia Nuclear Power Plant Security Assessment Technical Manual, and we do know that they say:
- 18″ reinforced (2 layers of no 4 rebar on 6″ centres) 3,000 PSI concrete lasts 3m54s against 20lb explosives and 10lb boltcutter,
- 12″ reinforced (6/16″ exmesh on 2.5″ centres) 5,000 PSI concrete lasts 23m against a cutting torch, 10lb sledgehammer and 6lb explosive, or 2m against 20lb explosive,
- 12″ reinforced (no 4 rebar on 6″ centres) 3,000 PSI concrete lasts 2m12s against 25lb explosives,
- 8″ reinforced (no 5 on 6″ centres) 3,000PSI concrete lasts 3m6s against 6lb explosive and hand hydraulic bolt cutter,
- 4” of reinforced concrete buys 5 minutes against hand tools (which would roughly match SR3),
- 8″ of grouted reinforced (no 8 each core) concrete masonry units buys 2m42s against sledgehammer and cutting torch,
- 8” of grouted reinforced (no 5 vertical on 14″ centres) concrete masonry units buys 1.5 minutes against a 10lb sledgehammer and 10lb boltcutters (which would roughly match SR2 or D1),
- either of those or 8” brick will stop a 7.62x 51mm rifle,
- 2″ x 4″ studs faced with 0.75″ shingles on 0.75″ planks and lined with 10mm plasterboard, again lined on protected face with sandwich of 0.75″ gauge exmesh and 2 x 0.75″ plywood, lasts 6m42s against a sledgehammer, cutting maul & 66lb battering ram, or 1m with a shaped charge,
- 2″x4″ studs faced each side with 0.75″ shingles (wood tiles) buys 1m24s against brace & bit with recip sabre saw,
- 2″x4″ studs faced each side with 10mm plasterboard lined with 3.6″ steel studs faced with 1/8″ steel sheet lasts 2m48s against a 10lb sledgehammer and acetylene torch,
- Butler wall of foam encased in 26 gauge galvanised steel lasts 1m against a 10lb fire axe (some residential doors were made of this in the 90s),
- The US Sandia nuclear plant training manual chapter 12, Access Delay, says a 18” reinforced concrete wall will last 5 minutes against explosives and cutting as explosives blast out concrete immediately, leaving just the rebars to cut. They recommend multiple walls to force intruders to carry tools through each one, lining concrete walls with steel both sides, and overburden by covering with earth. Explosives mean you are specifying a safe, rather than a home wall, so there is no insurance rating for bomb proof walls as such, instead you would use a rating for a strongroom.
- The upshot of nuclear standards is to use 4″ reinforced concrete or 8″ rebarred grouted CMUs, and remember they assume a reaction force – you need longer delay times if you don’t have an army on tap.
Prison standard
- In comparison, the standards in the 1987 USA DoC’s Standards for Building Materials, Equipment & Systems used in Detention & Correctional Facilities have been:
- 4” concrete to buy 3 minutes against a sledgehammer (which would roughly match SR3 or D3) for minimum security,
- 6” concrete with wider rebar spacing for medium security, and
- 8” concrete with rebars up and across at 8” centres for maximum security.
- Prison standards assume sustained attacks with makeshift tools, so could be quite relevant to a zombie / ROL scenario. Like the nuclear standard, they suggest to go for 4″ reinforced concrete or 8″ rebarred grouted CMUs for exterior walls, and 8″ reinforced concrete for a stronger saferoom or 12″ rebarred grouted CMUs for an even stronger saferoom. Curiously, where only battering rams are available but nothing to cut or pry with, 8″ rebarred grouted CMUs last about an hour against one man.
- Their testing found:
- 12” ungrouted hollow concrete blocks buy 1.5 minutes against a sledgehammer (which would roughly match SR2 or D1),
- 4” concrete reinforced with 0.25” gauge 6” square mesh reinforcement only buys 3 minutes against a sledgehammer and hydraulic boltcutters (which would roughly match SR3 or D3),
- 8” grouted no8 rebarred hollow concrete blocks buy 3 minutes against a sledgehammer and cutting torch (which would roughly match SR3 or D3),
- 6” concrete reinforced with no 5 rebars at 6” centres buys 8 minutes against a sledgehammer and hydraulic boltcutter (which would roughly match SR3 or D5),
- 8” concrete reinforced with two layers of 0.25” gauge 6” square mesh buys 12 minutes against a sledgehammer (which would roughly match SR4), and
- for the strongest wall you are likely to fit in a house, 12” grouted hollow concrete blocks reinforced with no6 rebar on 8” centres buys 20 minutes against a sledgehammer, hydraulic boltcutter and crowbar (which would roughly match SR5 or D20).
- There is also a test report on concrete prison wall attack resistance which found that 8″ reinforced CMUs last about 1,000 blows or 100 minutes against a battering ram. This did not allow for cutting or prying.
- These results highlight the benefit of poured concrete or steel sheet compared to blocks that eventually shatter.
Navy standard
- Looking at research in the 1993 US Navy Design Guidelines for Physical Security, plasterboard walls are useless and only take 18s to penetrate with even light hand tools.
- Chicken wire reinforcement buys an extra 12s.
- Replacing the attack face plasterboard with 1 inch thick tongue and groove wood buys an extra 42s, taking it to roughly SR1.
- Backing the tongue and groove with half inch plywood adds one minute (so still only about SR1).
- The vulnerability of the stud wall still means that even lining that with 5mm steel plate will not stop medium threat tools (like a hammer or axe for 2 minutes), leaving it equivalent to about SR1 or D1.
- 2” planks can survive 2 minutes of medium threat hand or battery tools (about SR1 or D1) or 72s high threat power tools (about SR1 or H1).
- It is of note that thick wood can at least buy some time against the worst hand tools (like sledgehammers and axes), power tools and oxy cutters but one minute is not much reaction time.
- Wood walls are stronger than plasterboard, but typically at best still only buy one or two minutes before the studs or planks give in, so are certainly not suitable for a panic room where you need a response time or protection against tools. However wood can be used as ballast for other materials such as steel or kevlar.
- The only imaginable use for wooden security walls would be somewhere with access restricted to searched people who won’t have tools even if they look for then indoors. Then as little as 15mm plywood would do.
- There was also a 1976 US Navy technical note on attack resistance of structural elements including walls, floors and roofs against holes 96″ square with one dimension 6″ made by heavy tools (sledgehammer, cutting maul (sledge ‘hamaxe’), crowbar, battering ram, punches, wedges, acetylene torch, boltcutters, brace & bit, hammer drill, diamond core drill, grinder, reciprocating saw, hydraulic jacks):
- No 11 chainlink 22×4″ delays a grinder 12s, a boltcutter 48s & cutting torch 90s.
- 1/16″ steel sheet delays a cutting torch 48s.
- No 9 chainlink delays a boltcutter 1m18s.
- 1/8″-1/4″ steel sheet delays a cutting torch or grinder 78s.
- 2″x4″ stud wall faced by 2″ wood delays 1.5 minutes against hand drill & saw.
- 8″ hollow concrete masonry unit delays 1.5 minutes against a sledgehammer.
- 4″ concrete block retrofit liner adds 90s delay to 8″ hollow concrete masonry units with 9 gauge 3/4″ exmesh.
- 2″x4″ stud wall on 16″ centres lined with plasterboard & faced with 1″x6″ diagonal planks + 15lb felt paper + bevel shiplap attack face delays about 2 minutes against heavy tools
- 8″ mortared concrete masonry units delays 2 minutes against a sledgehammer.
- 3/4″ no 9 exmesh delays boltcroppers 2 minutes, grinder 2m30s & 4 minutes cutting torch.
- 1″ steel sheet delays a cutting torch 2m12s.
- 4″ mortared cinder block faced with 4″ brick delays 2.4 minutes against a sledgehammer.
- 3/16″ exmesh delays a cutting torch 2m54s.
- 2″x4″ stud wall on 16″ centres lined with plasterboard & faced with 1″x6″ diagonal planks + 15lb felt paper + bevel shiplap attack face, reinforced with lining of 1/16″ steel sheet faced with 3/4″ plywood, delays about 3 minutes against heavy tools.
- 4″ reinforced concrete delays 3-4 minutes against sledgehammer and cutting torch.
- 2″ or so of mortar squeezed through steel mesh nailed to 8″ concrete masonry units adds 3m30s to the delay of the CMUs and mesh.
- 3″ steel sheet delays a cutting torch 4 minutes.
- 2″x4″ stud wall on 16″ centres lined with plasterboard & faced with 1″x6″ diagonal planks + 15lb felt paper + bevel shiplap attack face, reinforced with lining of 9 gauge 3/4″ exmesh faced with 3/4″ plywood, delays about 4m30s against heavy tools.
- 8″ reinforced concrete delays 11-12 minutes against drill, sledgehammer, punch & demolition saw, or 5.5-6.5 minutes against a jackhammer.
- 2″x4″ stud wall on 16″ centres lined with plasterboard & faced with 1″x6″ diagonal planks + 15lb felt paper + bevel shiplap attack face, reinforced with lining of ferrocement of 6 layers of 11 gauge 2″x4″ welded wire fence, delays about 6m42s against heavy tools.
- 2″x4″ stud wall on 16″ centres lined with plasterboard & faced with 1″x6″ diagonal planks + 15lb felt paper + bevel shiplap attack face, reinforced with lining of 2″ wide x 6″ deep planks, delays about 6m48s against heavy tools.
- 8″ lightweight concrete delays 8 minutes against drill, sledgehammer & punch.
- 4″ steel fibre reinforced concrete delays 8 minutes against drill, sledgehammer & punch.
- 3″ steel fibre reinforced concrete adds 16 minutes delay to concrete masonry units, due to synergy of the SFRC preventing CMUs spalling and CMUs delaying access to the SFRC. It takes 11m30s to even get to the SFRC.
- 8″ steel fibre reinforced concrete delays 25 minutes against drill, sledgehammer & punch, or 15 minutes against a jackhammer.
- 8″ mortared concrete masonry units backed by nailed on 3″ steel fibre reinforced concrete delays 26 minutes.
- Beware masonry is brittle with low tensile strength and vulnerable to shock loading; standard reinforcing is useless. SFRC with 2% fibre has much greater tensile strength and energy absorption so can triple delays.
- Rebar cut times are no 2/3 = 1s, no 4/5 = 2s, no 8 = 5s, 2.5″ = 27s.
- Rebar needs the addition of lacing bars to add delay, as used in blast walls.
- The jackhammer is the most consistent force multiplier for intruders.
- Shaped charge needs only 0.04 ounce per inch against 4″ reinforced concrete. For thicker walls heavier charges may simply crack the concrete to soften it up for tools.
- Exmesh performs well against blast and cutting torch as pressure and heat passes through the gaps. No 9 gauge 0.75″ is recommended. It is five times lighter but three times dearer than SFRC.
- Plywood behind steel slows down torch cutting thus forcing attackers to use a grinder to save time.
- Suggested combinations:
- 10 minutes delay from heavy tools (cutting torch, sledgehammer, punch, boltcutter, drill, grinder, saw, but not jackhammer or explosive) from:
- 8″ reinforced concrete, second cheapest but heaviest & thickest
- 4″ steel fibre reinforced concrete, second heaviest, cheapest & second thickest – ideal for new build
- 6 layers of 9 gauge 3/4″ exmesh, lightest, thinnest and dearest – good for retrofit
- 1/8″ steel sheet + 3/4 plywood + 4 layers 9 gauge 3/4″ exmesh, dearest & second lightest & second thinnest
- 20 minutes delay from heavy tools from:
- 8″ laced reinforced concrete, heaviest, thickest & dearest
- 8″ steel fibre reinforced concrete, heaviest, thickest & cheapest – ideal for new build
- 12 layers of 9 gauge 3/4″ exmesh, lightest, dearest & thinnest – good for retrofit
- 10 minutes delay from heavy tools (cutting torch, sledgehammer, punch, boltcutter, drill, grinder, saw, but not jackhammer or explosive) from:
Army standard
- There was also a 1996 US Army paper on 5 minute walls which tried to simulate SD-STD.01.01 FE5 tests on wood stud walls and wood faced concrete masonry unit walls. They tested studs, faced each side with 3/8″ plasterboard, lined with wood each side, on 8″ centres for 1″x6″ pine planks and on 16″ centres for 3/4″ plywood, attached with 14 gauge 1.75″ screws on 5.5″ vertical centres for planks (18″ for first vertical plank layer & 11″ on every other plank for second horizontal layer with 14 gauge 1.25″ wood screws for double version) & 12″ vertical centres for plywood & one per stud, double layers offset horizontally 6″, and the same facings attached with 10-14 gauge 1″ lead lipped screw anchors with 14 gauge 1.75″ wood screws to 4″ thick x 8″ x 16″ concrete masonry unit walls in steel top and bottom 1/4″ x 3″ x 3″ L channels fixed by 3/8″ hex lag screws, all anchored to reinforced concrete walls and floors with 3/8″ Hilti Kwik bolts in floor and 3/8″ hex bolts other three sides, attacking with 4′ crowbar, 9″x2.5″ wood splitting wedge and 10lb sledgehammer.
Stud walls
- Using Kant-Sag THD26 connectors, a stud wall faced with plywood and plasterboard achieved 4m56s against sledgehammers directed to the connection if two men took turns taking each swing.
- Using 18 gauge Simpson Strong-Tie LUS26 connectors a stud wall faced with plywood and plasterboard achieved 3m11s against sledgehammers directed to the connection with two men taking five swings each turn. On another test they took 4m50s to get through by attacking the connection with sledgehammers.
- Using Kant Sags again, but attacking the centre of the wall panel, two men took 3m35s to get through a stud wall faced with plywood and plasterboard with sledgehammers and a battering ram. On another test they only took 2m50s to get through with just sledgehammers.
- Using 14 gauge Kant-Sag JA5 connectors, one each side, a stud wall faced with plywood and plasterboard achieved 2m45s against two men with sledgehammers attacking the connection. On another test it achieved 5m12s as the men lost both sledgehammers through the hole they were making.
- Using 14 gauge Kant-Sag THD26 connectors a stud wall faced with plywood and plasterboard achieved 5 minutes against two men with sledgehammers, crowbar and wood splitting wedge attacking the connection and stud.
- Using 14 gauge Simpson Strong-Tue LB26 connectors a stud wall faced with plywood and plasterboard achieved 5m49s against sledgehammers.
Wood-lined concrete masonry unit walls
- A concrete masonry unit wall faced with two layers of 3/4″ plywood outside and one inside both covered with one layer of 3/8″ plasterboard achieved 14m31s against sledgehammers, crowbar and wood splitting wedge attacking the connection. The extra plywood attack face layer added 9m43s delay compared to the 4m48s achieved by the single layer setup against sledgehammers and crowbar.
- A concrete masonry unit wall faced with two layers of 1″x6″ planks outside and one inside both covered with 3/8″ plasterboard achieved 5 minutes against sledgehammers, crowbar and wood splitting wedge. The extra plank attack face layer added at least 1m59s delay compared to the 3m1s achieved by the single layer setup against sledgehammers, crowbar and kicking.
Conclusions
- It was found that stud walls fail at the connection between stud and floor or ceiling plate unless you use special connectors.
- It was found that strong connectors, especially the THD26, survive sledgehammering longer than studs.
- It was found easy to get through wood stud walls in 2 or 3 minutes with sledgehammers hitting the centre of panels as the hole was at an easy-to-climb-through height and the target was easy to swing at like a baseball bat.
- It was found that jabbing with lighter but more accurate blows was better at knocking off applique on the protected face.
- It was recommended that wood stud walls be upgraded with deeper studs, more plywood layers and reinforcement such as exmesh.
- It was found that two layers of wood are much better than one when holding together CMUs, and that plywood outperforms timber planks three to five times – presumably as plywood is stiff in both dimensions and the bigger boards spread the impact.
- It was found that plywood applique can hold together concrete masonry units even when the masonry is shattered and it works well when on both faces.
- It was found that sledgehammers work well against wood stud walls and plywood-faced concrete masonry unit walls, teamed up with crowbar or wood splitting wedge.
Military standard
- The USA DoD guide, Design of Buildings to Resist Progressive Collapse, has a section on how to strengthen buildings, including wooden joists.
- The 2020 US DoD Design to Resist Forced Entry uses tool groups called ‘threat severity levels’.
- Level II is low observable hand tools (hammers, saws, boltcroppers, pliers, spanners, tinsnips & wirecutters),
- level III adds unlimited hand tools (fire & rescue kit like crowbars, sledgehammers, cutting mauls, shovels & axes) and limited power tools (battery & hydraulic),
- level IV adds unlimited power tools (external electric, gas, hydraulic pump & compressed air) and thermal tools, and
- level V adds explosives (20lb TNT or 10,500 grain per linear foot linear shaped charge (‘LSC’)).
- Some of the testing for military standards was done for the US Defense Nuclear Agency in 1972, in Barrier Penetration Tests, US Department of Commerce, National Bureau of Standards NBS Technical Note 837, June 1974. You should be more cautious nowadays with the availabiity of cheap power tools. They tested concrete masonry units and wood frames. Using tools such as sledgehammer, wrecking bar, punches and rotahammer, they found:
- 12″ brick lasts 8 mins,
- 8″ reinforced grouted CMUs lasted an average 8 mins,
- 8″ grouted CMUs with a no 8 rebar per core lasted:
- 1m31s against a 54 blows from a sledgehammer before a hole was made and a total of 1m43s and a further 47 blows before it was big enough to climb through, although it then needed a couple of cuts with an acetylene torch taking 19-101s for the single exposed rebar, a total of as little as 3 mins and in practice 5 mins for the inexperienced with gaps in working time,
- 4s per inch of hole against a rotahammer drilling holes in a circle to punch out a hole with steel punches and a sledgehammer – leading to half the thickness of the wall spalling off within 7.5 mins, finished off after a total of 10-12 mins with a sledgehammer and acetylene torch;
- 8″ grouted CMUs last under 2 mins,
- 4″ SRC lasts 10 mins,
- 8″ grouted CMUs backed by 4″ SRC works best, lasting 25 minutes working time with 1,025 blows to make a 96 square inch hole, this is the most cost effective combination tested in £ per minute delay, although nearly four times the price of the plywood / exmesh combo which only lasts 26% as long and is the second most cost effective, and testers proposes lining it with 3/16″ steel plate to turn it into even more of a monster as not only would attackers need a torch as well as a sledgehammer but the steel would help stop spalling,
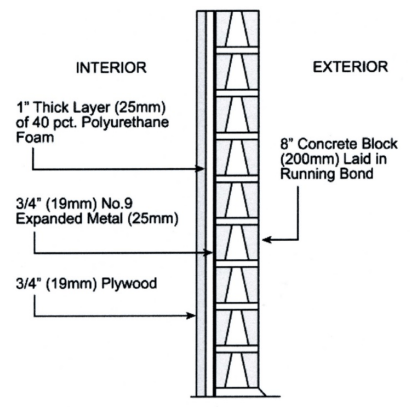
- 8″ CMU faced by 3/4″ no 9 exmesh, faced by 1″ 40pcf polyurethane foam, faced by 3/4″ plywood, lasted 4 mins against a sledgehammer, chopping maul and battering ram, and would last between 3 and 9 mins against a crowbar, rotary saw and battering ram,
- 8″ CMU faced by 2 layers of diamond mesh, faced by 1″ polyurethane foam, lasts 8 mins against a rotahammer, rotary saw and wrecking bar, or 3 mins if only a wrecking bar is used against concrete instead of saw and hammer, or 2 mins if only a chopping maul and sledgehammer are used against the whole wall,
- 8″ brick backed by 4″ concrete block sandwiching 3/4″ no 9 exmesh lasts 8 mins against a sledgehammer and suspended battering ram although a hole can be in 3 mins,
- 8″ CMU backed by 4″ concrete blocks sandwiching nailed 3/4″ no 9 exmesh lasts 9 mins against a rotahammer, punch, sledgehammer, wrecking bar and oxyacetylene torch, or 5 mins against battering ram and boltcutters.
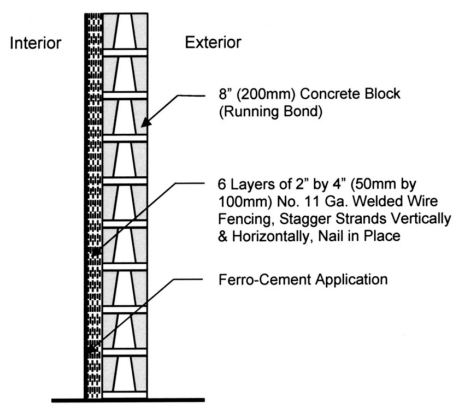
- 8″ CMU backed by 6 offset layers of nailed 2×4″ no 11 welded wire fence backed by ferrocement lasts 11 mins, against a sledgehammer, cutting maul, wrecking bar and boltcutter, or 10 mins with oxyacetylene torch on the wire or 6 mins with a cutoff saw on the wire,
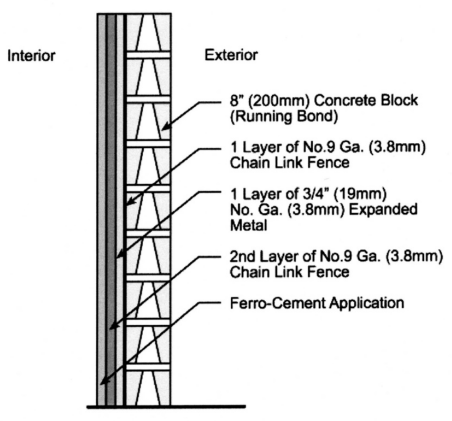
- 8″ CMU backed by no 9 chain link backed by 3/4″ no 9 exmesh backed by no 9 chain link backed by ferrocement lasts 10 mins against sledgehammer, wrecking bar and boltcutters, and still 10 mins if a cutoff saw replaces the wrecking bar and boltcutters,
- wooden 2×4″ stud walls with 16″ centres, faced with 1×6″ sheathing faced with no 15 felt paper faced with bevel siding with 1.5″ overlap, lined with 3/8″ plasterboard, faced with 3/4″ plywood faced with 1/16″ steel plate, both fixed with 3″ annular ring nails on 4″ centres, lasts 2m4s before the wood face is cut off with a hubless saw, then 20s before a sledgehammer smashes out the stud, then 3m30s to 5m4s before a disc cuts out the plasterboard, plywood & steel lining, total working time of 6m1s to 7m28s – showing you can use a stud wall for security,
- wooden 2×4″ stud walls with 16″ centres, faced with 1×6″ sheathing faced with no 15 felt paper faced with bevel siding with 1.5″ overlap, lined with 3/8″ plasterboard, faced with a sandwich of two layers of 3/4″ plywood containing no 9 exmesh, lasts 33 blows over 45s before a battering ram smashes off the wood face, 20 blows over 33s before a sledgehammer smashes out the stud, 25 blows from a cutting maul over 40s to remove excess planks, then, as battering rams bounce off, 57 blows of a cutting maul over 3m39 before a hole was made and another 114 blows before a man size hole was made, total working time 6m44s – showing the benefit of plywood and exmesh in slowing down sledgehammers and mocking battering rams – making for long delay times against military low threats tools or LPS 1175 tool group C, it is also the second most cost effective per £ per minute delay after the much stronger SRC lined grouted CMUs,
- wooden 2×4″ stud walls with 16″ centres, faced with 1×6″ sheathing faced with no 15 felt paper faced with bevel siding with 1.5″ overlap, lined with 3/8″ plasterboard, faced with 6 offset layers of nailed 2×4″ no 11 welded wire fence faced with ferrocement lasts 43 blows of a cutting maul before the planks are chopped off then 113 blows of a sledgehammer the stud is smashed out and ferrocement spalled off taking a total of 4m43s working time, before the ferrocement wires take 2m7s to cut with 3/8″ boltcutters, a grand total working time of 6m50s, meaning you are better of with the plywood sandwich than cement,
- wooden 2×4″ stud walls with 16″ centres, faced with 1×6″ sheathing faced with no 15 felt paper faced with bevel siding with 1.5″ overlap, lined with 3/8″ plasterboard faced with 2×6″ planks stacked side by side takes:
- 40 cutting maul blows before the planks are chopped off then 28 sledgehammer blows before the stud is smashed out, taking a total of 1m58s working time, then 1m23s to drill and 4m35s to saber saw through the 2x6s at 14s per inch, taking a total of 5m58s, then 3m35s to smash out the wooden plug from its nails with a sledgehammer, crowbar and wrecking bar, total working time 12m8s,
- a hubless saw takes 6s per inch through the 2x6s or 3m40s to make a 100 square inch hole, anyway the test teamed up a hubless saw with a petrol saw which took 1m26s to cut off the outside planks, then 4m14s to cut the 2x6s, before 46 blows of a sledgehammer over 1m6s rammed out the plug, totalling a working time of 6m47s, which testers thought could have been under 6 minutes without saw swapovers,
- 8″ lightweight aggregate 120lb/ft3 concrete with no 5 rebar at 6″ centres both ways was rotahammered at 2.4s per inch to make rings of holes ready for spalling taking 2m10s, these were punched with 104 blows of a sledgehammer on punches within 2m44s, then with the outside of the wall spalled the inside was given 35 blows of a sledgehammer to achieve a hole then 23 blows to widen it to 6″ taking 1m26s, it was then widened by spalling a wider circle into it with 86 blows over 2m23s, and finally four rebars were cut with a thermal lance over 32s, total working time 9m31s, and would have taken 11m28s if an oxyacetylene torch had been used,
- 8″ lightweight aggregate concrete can be penetrated by a thermal lance in 1 minute,
- 8″ lightweight aggregate concrete with no 5 rebar at 6″ centres both ways can be spalled 2.5″ in 10 mins by 301 blows of a 50lb battering ram, but it does not look like a promising method and without a frame to suspend the ram it can’t be continued due to shock up operators’ arms,
- 8″ lightweight aggregate concrete with two layers of no 2 rebar at 6″ centres 2″ from each surface both ways can have their rebar cut with boltcutters without needing a torch, and the wall lasts 9m45s against a rotahammer, sledgehammer, punches and boltcutter,
- wooden 2×4″ stud walls with 16″ centres, faced with 3/8″ plasterboard, lined with 3/8″ plasterboard faced with 1/4″ thick 16″ wide steel plates variously spot or continuously welded to 16 gauge steel studs nailed to wooden studs with annular ring monel nails on 3″ centres last 38s before the plasterboard is booted out, it took 12s per inch to cut the steel plate with an oxyacetylene torch totalling 6m52s cutting followed by 25 blows of a sledgehammer taking 46s to snap the spot welds, a total of 8m16s working time – with spot welding being the vulnerability and continuous welding forcing attackers to use slow cutting; using a burning bar instead took only 2m to cut out the steel plate at 2.3s per inch, total working time of 2m14s, making steel plate worse than concrete if attackers have a thermal lance, although we don’t know how continuous welding would have fared against the sledgehammer,
- wooden 2×4″ stud walls with 16″ centres, faced with 3/8″ plasterboard, lined with 3/8″ plasterboard faced with 1/8″ thick 16″ wide steel plates welded to 16 gauge steel studs nailed to wooden studs with annular ring monel nails on 3″ centres lasted a total working time6m9s against a sledgehammer on the plasterboard (23s), oxyacetylene torch (5m31s at 10.33 per inch) and sledgehammer (16s against spot welds) on the steel plate, but on another attempt with correct torch controls they achieved 4.48s per inch cut and were through in 2m47s from start to finish, meaning an oxyacetylene torch is a big threat to thin metal plate with no masonry to shield it, and when a burning bar was used instead the total working time was 1m55s, and a rerun achieved 1m31s with a shorter burning bar cutting 1.35s per inch,
- An advantage of a wall resistant to sledgehammer is that it forces attackers to come mob handed to avoid fatigue.
- Testing shows that rebar is of limited use as it only really stops concrete fallings sideways, whereas you want to stop it falling backwards, and for that ferrocement is great but SRC is even better.
- It seems unlikely post-SHTF marauders will be able to exceed medium threat level if they are struggling to fuel transport or tools, so that military standard of design basis threat should be more than enough.
- From level IV it is assumed guns up to UL753 level 3 will be used too, but to overpower guards, not penetrate a barrier. This is a reminder that if you are turning your home into a safe you better have armed response.
- Linear shaped charges (LSCs) are sized according to material and its thickness, using a formula for steel t-0.027 x W to the power of 0.547, where W = grains per foot, which means the standard’s assumed explosive weight would cut 109mm steel. The multiplier for other materials is, for example, 1.6 for concrete (as it is weaker) and 0.8 for armoured steel as it is stronger. Fibrous concrete needs 50% more explosives. Sandia say 50lb of explosive and tamping with go through up to 8″ reinforced concrete in 2-3 minutes if followed up by sledgehammer and boltcutter.
- Threat levels have matching protection levels from:
- Level I – very low (no delay) through
- Level II – low (adds 1 minute delay (or exceeding minimum response time) with alarmed openings, with breaches elsewhere detected by patrols),
- Level III – medium (5 minutes delay (or exceeding minimum response time) upgraded to ring of detectors) and
- Level IV – high (15 minutes delay (or exceeding maximum response time) adding requirement for the detectors to include two technologies) to
- Level V – very high (30 minutes delay (or exceeding maximum response time by 25%) with two technologies).
- A high security domestic protection level would be level III (medium). Unfortunately, normal bricks walls only offer level II (low). Generally you will need to line external walls or build saferooms with plywood and steel (and maybe polycarbonate) sandwiches. The challenge is how to attach strong liners to weak walls.
- For example:
- a sandwich of ¾” plywood between 10 gauge (3.1mm) hardened steel delays 7 minutes at low threat level II,
- a stud wall of 2 x 3/8” plasterboard outside and 1/8” mild steel inside delays 7 minutes at medium threat level III (13 minutes at level III with ¼” mild steel or 1 minute at high threat level V),
- a sandwich of ¾” plywood between plates of 9 gauge (3.5mm) hardened steel delays 5 minutes at level V.
- Materials determine the protection levels provided.


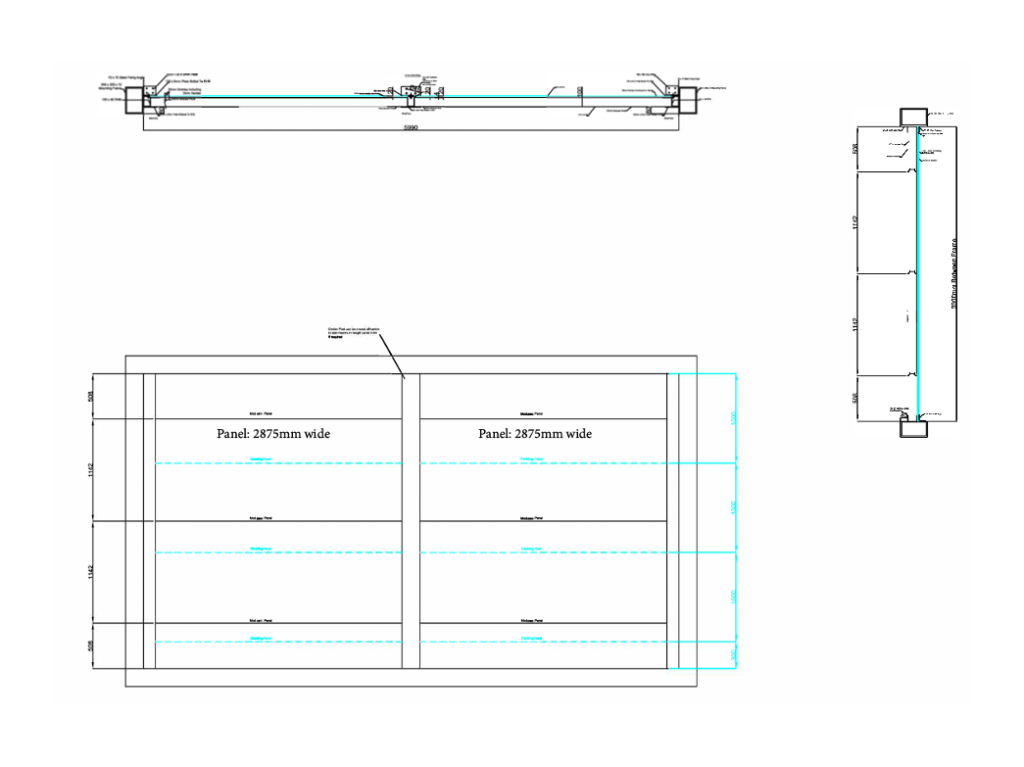
(or use a no 8 rebar per core instead of exmesh in SFR)
- If you want a wall that bad guys will never get through with level 3 attacks and which will also buy 30 mins against level 4 attacks (may be perfect for a saferoom) the diagram above shows you how. Its a retrofit but could be built new. You need 8″ filled CMUs backed by 4″ SFR concrete containing 1kg-grade exmesh all held on with mortar ties on each core.


Level I
- Level I – Very low protection, less than a minute, comes from conventional masonry, stucco, plasterboard, thin plywood and thin sheet metal.
Level II
- Level II – Low protection, comes from thin masonry, stud walls, planks, thin plywood, thin steel plate, exmesh. Masonry, steel and plywood can offer extended delays for low threats with long response times. Normal homes walls only offer 1-3 minutes at level II.
- 1 minute from 4” brick,
- 1 minute from masonry, sheet metal or ¾” combination of plywood & plaster,
- 1 minute from stud wall with plasterboard inside and wood ship lap (typically 1/2”) outside,
- 1 minute from stud wall on 16” centres with chicken wire sandwiched between plaster face and tar paper, and ½” plasterboard inside,
- 2 minutes from 4” reinforced hollow concrete blocks,
- 2 minutes from 4” grouted hollow concrete blocks with no 8 rebar at 8” centres,
- 2 minutes from 8” hollow concrete blocks,
- 3 minutes from 8” interlocked brick,
- 3 minutes from 8” hollow concrete blocks, plus 2 layers of diamond mesh plaster lath, plus 1” polyurethane foam,
- 5 minutes from felt sandwiched by facing of 1.5” bevelled cedar ship lap and 1”x6” planks on 2”x4” studs at 16” centres, with 6 layers of 11 gauge (2.7mm) 2”x4” woven wire sandwich by 3/8” plasterboard and 4” ferrocement facing inside,
- 5 minutes from 8” concrete blocks reinforced with no 3 rebar each way on 8” centres,
- 6 minutes from 4” 3,000PSI concrete with no 5 rebar each way at 5” centres,
- 7 minutes from ¾” plywood sandwiched between two layers of 10 gauge (3.1mm) hardened steel,
- 8 minutes from 8” hollow concrete blocks, plus wire fabric, plus 4” ferrocement,
- 9 minutes from 6” 3,000PSI concrete with no 4 rebar each way on 8” centres,
- 12 minutes from two layers of ¾” plywood sandwiched between three layers of 10 gauge (3.1mm) hardened steel, 5 layers total,
- 14 minutes from ¾” plywood sandwiched between two layers of 9 gauge (3.5mm) hardened steel,
- 15 minutes from 8” grouted hollow concrete blocks with no 6 rebar each way at 8” centres,
- 20 minutes from ¾ plywood sandwiched between two layers of 10 gauge (3.1mm) hardened steel with 0.9lb per square foot asphalt between steel liner and plywood,
- 21 minutes from 12” grouted hollow concrete blocks with no 6 rebar on 8” centres,
- 27 minutes from 8” grouted hollow concrete blocks, plus 3” fibrous concrete,
- 30 minutes from 12” grouted hollow concrete blocks with no 6 rebar each way on 8” centres.
Level III/IV
- Level III/IV – Medium or high from reinforced grouted hollow concrete blocks or masonry; metal, plastic or wood composite for short delay or reinforced concrete for long delay:
Level III delays
- Grouted hollow concrete blocks can delay up to 5.5 minutes, or longer if reinforced.
- Reinforced 6” concrete can delay up to 7.5 minutes assuming B curve rebars (one of the military specifications for spacing and thickness). By also adding steel fibre by 5% volume, delay can be increased to 11 minutes. However, anything stronger than 6” B curve reinforced concrete is hard to use medium threat tools against.
- Delays from solid concrete blocks or reinforced concrete can be doubled by lining with 10 gauge (3.1mm) steel sheet fixed with taper bolts or expansion sleeve anchors.
- 1 minute from 1” tongue and groove over 0.5” plywood on attack face and 9 gauge (3.5mm) chain linked nailed to wall or 3/16” steel plate rag bolted to wall on protected face,
- 2 minutes (also at level IV) from 8” hollow concrete blocks in running bond retrofitted with backing of two layers of diamond mesh covered with 1” 40pct polyurethane foam,
- 3 minutes (also at level IV) from 8” hollow concrete block in running bond retrofitted with backing of ¾” no 9 exmesh, 1” 40pct polyurethane foam and covered with ¾” plywood,
- 4 minutes (also at level IV) from 8” hollow concrete blocks in running bond retrofitted with backing of no 9 exmesh fixed with nails and covered with 4” concrete blocks,
- 5 minutes from 2”x4” wood stud wall on 16” centres covered on attack face by ship lap overlapping 1.5” backed by no 15 felt paper, diagonal 1”x6” sheathing and 3/8” plasterboard, and covered on protected face by sandwich of two layers of ¾” plywood and no9 exmesh,
- 5 minutes from continuous side by side 2”x4” wood studs faced with 2” thick planks making 6” thick wood wall,
- 5 minutes from 8” concrete blocks with no5 rebar each way on 8” centres,
- 6 minutes from 4” 3,000PSI concrete with no5 rebar each way on 5” centres,
- 7 minutes (6 minutes at level IV) from 8” hollow concrete blocks in running bond, retrofitted with backing of six staggered layers of 2”x4” 11 gauge (2.7mm) welded wire fence fixed with nails, covered by ferrocement,
- 7 minutes from 2”x4” stud wall on 16” centres with 2 x 3/8” plasterboard facing out and 1/8” mild steel sheet inside,
- 7 minutes from 6” reinforced concrete with US military specification B-curve bars (eg no 3 on 9” horizontal centres & 8” vertical centres),
- 8 minutes (4 mins at level 4) from 8” hollow concrete blocks in running bond retrofitted with backing of one layer of 9 gauge (3.5mm) chain link, one layer of ¾” 9 gauge exmesh, one layer on 9 gauge chain link and covering of ferrocement,
- 8 minutes from 8” grouted hollow concrete blocks with no 4 rebar every course,
- 8 minutes from 8” hollow concrete blocks, plus wire, backed by 4” ferrocement,
- 8 minutes (4 mins at level 4) from 8” hollow concrete blocks in running bond retrofitted with backing of one layer of 9 gauge (3.5mm) chain link, one layer of ¾” 9 gauge exmesh, one layer on 9 gauge chain link and covering of ferrocement,
- 9 minutes delay from 4” 6,000PSI concrete with no5 rebar each way on 5” centres,
- 9 minutes from 8” fibrous 3,000PSI concrete with no5 rebar on 5” centres,
- 9 minutes from 8” hollow concrete blocks, backed by 1.5” plywood or backed by 0.15lb per square foot asphalt sandwiched between two sheets of ¾” plywood,
- 10 minutes from 2”x4” stud wall on 16” centres of facing of felt sandwiched between 1.5” bevelled cedar planks and 1”x6” planks, and lining of ¾” plywood sandwiched between 3/8” plasterboard backing and 1/6” sheet metal (presumably mild steel) facing,
- 12 minutes from ¼” steel plate face over 20 gauge (0.8mm) 3” (deep rib) roof deck over 3” silicate foam over 1” plywood,
- 13 minutes from 4” 6,500PSI fibrous concrete with no5 rebar each way on 5” centres,
- 13 minutes from facing of two layers of 3/8” plasterboard on 2”x4” studs on 16” centres with ¼” mild steel sheet inside,
- 15 minutes from 8” reinforced concrete with no4 rebar each way on 6” centres,
- 28 minutes (23 mins at level 4) from grouted 8” hollow concrete blocks in running bond retrofitted with backing of 3” concrete reinforced with 0.2mmx75mm steel fibres fixed with 2.5” flat head case hardened nails 1” into masonry each way on 6” centres,
- 30 minutes from 12” reinforced concrete with two layers of no7 rebar each way on 4” centres.
- Indefinite delay from 8” grouted hollow concrete blocks retrofitted with backing of 1kg exmesh and 4” steel fibre reinforced concrete with masonry ties into each course.
Level IV delays
- Grouted hollow concrete blocks can delay up to 18 minutes with the right thickness.
- Reinforced concrete can delay up to 35 minutes. Steel fibre addition can increase delay to up to 50 minutes.
- Delays from solid concrete blocks or reinforced concrete can be doubled by lining with 10 gauge (3.1mm) steel sheet fixed with taper bolts or expansion sleeve anchors.
- 1 minute added by a welded steel grating (slats 1” deep & 3/16” thick on 1” horizontal centres with 5/16” bars welded and cut into their edges on 2” vertical centres) retrofitted to a stud wall by bolting through or using lag bolts, if fixed to concrete block or reinforced concrete with taper bolts or expansion sleeve anchors it can add 100% to delay of concrete wall by preventing spalling,
- 2 minutes added by a riveted steel grating (210kg/m3, slats 1” deep & 3/16” thick on ¾” centres with mesh of the same bolted to slats on 7” centres) retrofitted to a stud wall by bolting through or using lag bolts, if fixed to concrete block or reinforced concrete with taper bolts or expansion sleeve anchors it can add 100% to delay of concrete wall by preventing spalling,
- 2 minutes from 6” 3,000PSI concrete with no4 rebar each way on 8” centres,
- 3 minutes from 8” grouted hollow concrete blocks with no8 rebar,
- 3 minutes from 8” hollow concrete block lined with a sandwich of 1” polyurethane foam between backing of ¾” plywood and facing of 9 gauge (3.5mm) ¾” exmesh,
- 5 minutes from 4” 6,000PSI concrete with no5 rebar each way on 5” centres,
- 5 minutes from 8” fibrous concrete with no5 rebar each way on 5” centres,
- 5 minutes from 8” grouted hollow concrete blocks with no4 rebar every course,
- 5 minutes from 8” concrete blocks with no4 rebar on 4” centres vertically and on 8” centres horizontally,
- 5 minutes from 2”x4” stud wall faced by sandwich of felt backed by 1”x6” planks and faced by 1.5” bevelled cedar ship lap, with sandwich of 3/8” plasterboard under ¾” plywood under 9 gauge (3.5mm) ¾” exmesh under facing of ¾” plywood inside,
- 6 minutes added by retrofitting a lining of a sandwich of two layers of hot rolled 10 gauge (3.1mm) steel and one layer of ¾” plywood, and an extra 5 minutes from each extra layer (22mm) of plywood and steel,
- 6 minutes from 8” 6,000PSI concrete with no5 rebar each way on 5” centres,
- 7 minutes from 12” 6,500PSI fibrous concrete with no5 rebar each face on 6” centres,
- 11 minutes from 8” 3,000PSI concrete with no5 rebar each way on 6” centres or no6 rebar on 12” centres,
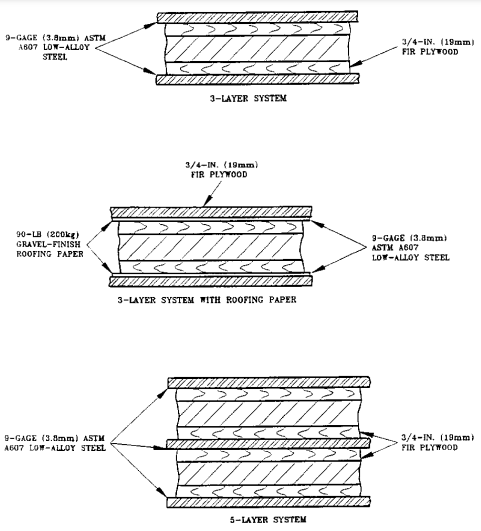
- 14 minutes added by retrofitting a lining of a sandwich of two layers of 9 gauge (3.5mm) ASTM A1008 class 2 high strength low alloy steel and one layer of ¾” plywood, fixed with taper bolts or expansion sleeve anchors, adding 0.9lb per square foot gravel finish roofing paper between the plywood and steel layers takes the added delay to a total of 20 minutes, to this can be added 100% of the concrete block delay as the lining prevents spall,
- 15 minutes from 8” 3,000PSI concrete with no4 rebar each way each face on 9” centres,
- 15 minutes from 12” reinforced concrete with no5 rebar each way on 6” centres,
- 24 minutes from 8” grouted hollow concrete blocks, backed by 3” fibrous concrete,
- 30 minutes from 12” 3,000PSI concrete with 5/16” exmesh on 2.5” centres with 0.25” backing plate,
- 30 minutes from 8” grouted hollow concrete blocks retrofitted with backing of 1kg exmesh and 4” steel fibre reinforced concrete with masonry ties into each course.
- 31 minutes from 12” 3,000PSI concrete with no5 rebar each face on 6” centres.
Level 5
- Level V – Very high from reinforced concrete with sacrificial walls or bunker thickness (at least 18”-48″, or over 4 feet for 30 minutes delay).
- Reinforced concrete will delay:
- 1 minute at 8” thickness with no 6 rebars at 6” centres,
- 2 minutes with 2 such layers of rebar in 12” thickness,
- 3 minutes with 3 layers of rebar in 18” thickness,
- 4.5 minutes with 4 layers of rebar in 24” thickness,
- 8 minutes with 6 layers of rebar in 36” thickness and
- 13 minutes with 8 layers of rebar in 48” thickness.
- Level V delays are:
- 1 minute from 8” concrete blocks with no3 rebar each way on 8” centres,
- 1 minute from two layers of 3/8” plasterboard facing on 2”x4” wood studs on 16” centres lined with ¼” mild steel sheet,
- 4 minutes from 8” grouted hollow concrete blocks with no4 rebar every course,
- 5 minutes from 8” 6,000PSI concrete with no5 rebar each way on 5” centres,
- 5 minutes from 12” 3,000PSI concrete reinforced with four layers of 5/16” exmesh on 2.5” centres,
- 5 minutes from ¾” plywood sandwiched between two layers of 9 gauge (3.5mm) hardened steel,
- 6 minutes from 12” 6,500PSI fibrous concrete with no5 rebar each face on 6” centres,
- 9 minutes from 8” 3,000PSI concrete with no5 rebar each way on 6” centres,
- 10 minutes from 8” 3,000PSI concrete with no6 rebar on 12” centres,
- 10 minutes from 4” 6,500PSI fibrous concrete with no5 rebar each way on 5” centres,
- 14 minutes from 8” 3,000PSI concrete with no4 rebar each way each face on 9” centres,
- 15 minutes from 12” 3,000PSI concrete reinforced with four layers of 5/16” exmesh on 2.5” centres with ¼” (presumably mild steel) backing plate,
- 30 minutes from 18” 3,000PSI concrete reinforced with 5/16” exmesh on 2.5” centres with ¼” backing plate (presumably mild steel).
- Reinforced concrete will delay:
Rebar
- A 5 minutes delay, as found in SR3 for a high security home, can be obtained from 5” grouted hollow concrete blocks with US military ‘C curve’ rebar (no 8 at 9”). To do it with B curve rebar (no 3 at 9”) would need a 10” wall. To do it with reinforced concrete needs only a 2” wall with C curve rebar, a 5” wall with B curve rebar or a 6” wall with A curve (nil) rebar. To get the 10 minutes required by SR4 needs a reinforced concrete wall to be 4” with E curve rebar (no 8 at 3.5”), 5” with D curve rebar (no 8 at 4.5”), 6” with C curve rebar (no 8 at 9”), 8” with B curve rebar (no 7 at 9”) or 9” with A curve (nil) rebar.
- Rebars should be at minimum 8” vertical spacing.
- In reinforced grouted hollow concrete blocks, extra rebar provides most delay whilst wall thickness adds little delay. For example, at US military standard rebar curve G (tightly spaced thick rebars), doubling wall thickness from 6” to 12” only adds 3 minutes delay, whereas beefing up rebar from curve B to curve G adds 10 minutes.
Table C-14
- The US UFC Table C-14 also guides you through the Apocalypse:
- Your wall options range from:
- meshing 4” masonry, through
- 8” concrete blocks reinforced with no 3 rebars on 8” centres, to
- 8” concrete reinforced with no 4 rebars on 6” centres,
- if 12” rebarred concrete is not enough then you reinforce with 8mm mesh on 2.5” centres – which means four layers – with 6mm steel plate liner, and
- if that is not enough then you go for 18” concrete (with seven layers of mesh if you accept reinforcement so much closer than the usual 3” from the surface).
- Retrofit options range from:
- lining with 18mm plywood, through
- inserting rebars or grating in the cavity,
- inserting 9 gauge (3.7mm) steel mesh, and
- inserting between 9 gauge to 6mm steel plate.
- Grating is not great as it takes up room depth and fabrication time yet only adds one or two minutes penetration time which would be much longer if the space was used up by extra layers of steel and plywood, although they have a weight advantage of being only 130-210kg/m3. The navy has in the past suggested lining hollow concrete blocks with steel mesh fencing before applying 3” of ferro cement or 4” concrete blocks to add a few minutes penetration time.
- Another option for high threat retrofit is sandwiches of 18mm plywood and steel plate:
- Three layers of 10 gauge (3.2mm) steel plate sandwiching two layers of 0.75” plywood buys 6 minutes (about SR3 or H5).
- Three layers of 0.25” stainless steel protecting 0.5” polycarbonate backed by one layer of 10 gauge (3.1mm) low alloy steel plate buys 10 minutes (about SR4 or H10).
- Five layers of 10 gauge steel plate protecting 0.75” plywood backed by a layer of 10 gauge steel plate and another 0.75” plywood and another layer of 10 gauge steel plate buys 11 minutes (about SR4 or H10).
- Three layers of 9 gauge (3.7mm) low alloy steel plate protecting 0.75” plywood backed by one layer of 9 gauge (3.5mm) low alloy steel plate buys 14 minutes (about SR4 or H10).
- A ballistic & manual attack option is five layers of 10 gauge (3.1mm) steel plate protecting 0.5” polycarbonate backed by one layer of 10 gauge steel plate and another layer of 0.5” polycarbonate and another layer of 10 gauge steel plate (presumably at least about SR4 or H10 in manual attack terms).
- 9mm steel mesh lining a reinforced concrete wall can add 14 minutes penetration time against medium threat heavy hand and battery tools (taking it to at least about SR4 or F10). High threat power tools can be delayed by lining reinforced concrete with 10 gauge (3.1mm) steel plate fixed with lag bolts.
- Your wall options range from:
- Glazing should be 17-24mm polycarbonate glass.
- Doors should be at least 12 gauge (2.6mm) steel, and are better if filled with concrete, and even better with multipoints, better yet if 6” thick concrete faced with 13mm steel plate, better still with mesh reinforcement and 18mm steel attack face plate, or 10” concrete fill to push it further and if the zombies are well organised your last resort is to frame those doors in C-steel grating vestibule. Retrofitting can be done with a blast resistant vestibule to force attackers to blast through two doors one at a time.
- Roofs need to be at least steel decking, better if with concrete and even better if it is reinforced with at least no 4 bars, better yet is 10 gauge (3.2mm) 6×6” mesh reinforcement, better still is two layers of rebars in thicker concrete, or going further with layers of 5/16 mesh reinforcement every 2.5” and ideally backed up by 6mm steel plate. Retrofitting options range from 18mm plywood on top over metal, through no 5 8” square rebar mesh underneath, and resurfacing with 9 gauge (3.7mm) mesh, or resurfacing with between 9 gauge and 6mm sheet, to ultimately putting a steel-plywood sandwich on top as per wall retrofits.
Embassy standard
- The USA standard DCID 6/9, Physical Security Standards for Sensitive Compartmented Information Facilities (replaced by the 2020 NCSC Technical Specifications for Construction and Management of Sensitive Compartmented Information Facilities) is for (above top secret) vaults.
- It was:
- (unspecified thickness, probably 12″ for 15 mins response time) reinforced concrete with 2,500PSI strength and 5/8” rebars spaced 6 inches, or
- thinner walls can be lined with ¼” steel plates continuously (which buys about 15 mins at level III).
- Rooms leading to it should be lined with 1/8” steel plate or 9 gauge (3.7mm) steel mesh.
- This reminds us how even a vault of 6mm steel or 12″ reinforced concrete needs a reaction force within 15 mins.
- Also see the US DoD SCIF Planning, Design & Construction.
Marines armoury standard
- US Marines say 8” interlocked brick is as good as 8” reinforced concrete. However, when they come to specify protection levels, they clarify that its six times weaker at threat level IV, will only buy 2 minutes at threat level III (which should last 5 minutes), but cannot be penetrated at threat level II. It is best paired up with a gun and perimeter alarm to ensure you provide an armed response in the event the bad guy comes for your stash with a sledgehammer.
- Armoury standard is another reminder that unreinforced brickwork is not much better than wood as it is too brittle, so a zombie / WROL scenario needs such walls to be lined or a saferoom built.
- See also:
- RF-proofing rooms will deal with much of that as a byproduct of materials and tolerances used.
- There is also heartbeat detection such as sold by Westminster International for spotting stowaways.
Strongroom
- Some entry level strongrooms such as some panic rooms are technically only ‘secure enclosures’, ie safes, so are only accredited to LPS1175 or EN1627. If LPS1175 is not strong enough for you then you could use a modular solution. In Europe strongrooms are accredited to EN1143-1 the same as safes, or LPS1183. EN1143 grades above I can be rated against explosives, and grades above VII can be rated against diamond core drill. Up to grade IX needs 40cm reinforced 60MPa concrete, grade X 50cm, grade XI 60cm, grade XII 75cm and grade XIII 100cm. Grade VIII upwards need anti core drill reinforcement. Grade VII upwards need two rows of reinforcement.
- Concrete can be strengthened by structural reinforcement but mainly by security reinforcement. Either can be achieved with carbon fibre reinforced polymer or ultra high performance reinforced concrete UHPFRC. But specialist products include Fichet Bauche Tordbar or Chubb Tangbar or spiral reinforcement. Chubb recommended a concrete mix of 1 part ferrocrete cement, 1.5 parts clean sharp sand, 2.5 parts 19mm granite, 0.5 part 6mm granite.
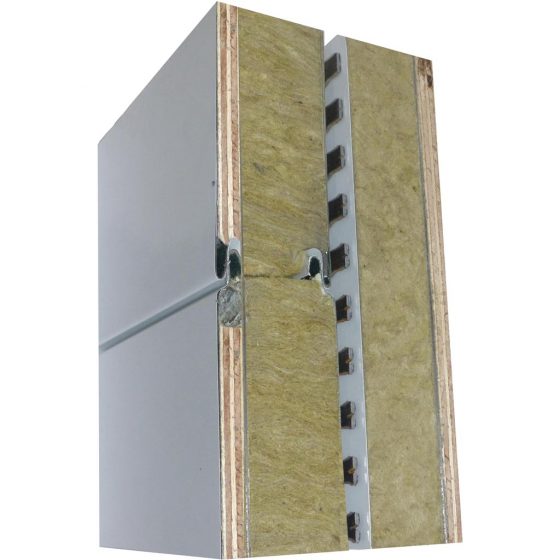
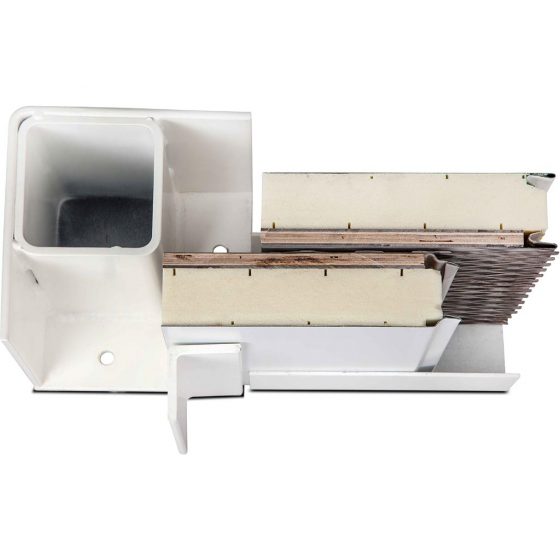
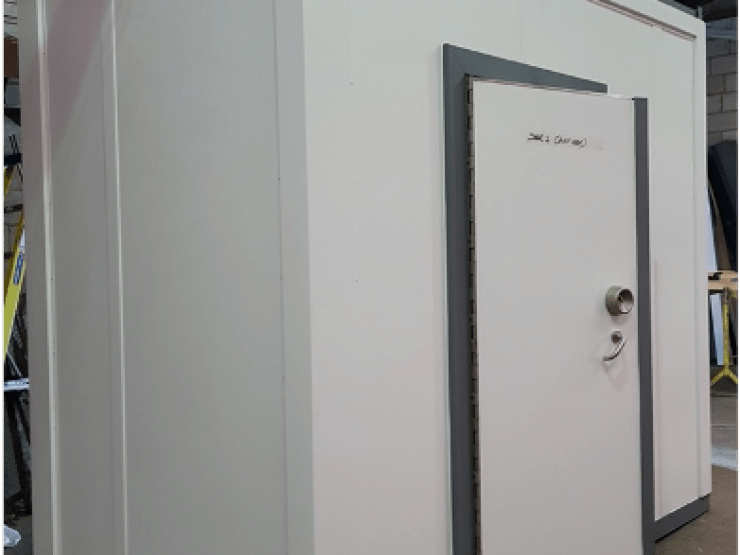
- Modular wall systems are popular because they can be specified to multi threat in an existing building using laminated panels. They include:
- Secure enclosures
- Safetell Citiwall up to SR4 (upgradeable to FB6, or FB4 & EXV25),
- Modusec up to SR5 (SR3 40kg/m2, SR4 45kg/m2) and 120mm thick Modusec GS to NPSA MFES v1.0 (foamed-in exmesh, 15-20mm overclad (3mm hardened steel & OSB), 75kg/m2) & C15 & FB6 option,
- Burton Talos up to SR4 (wall panels made of thin steel (twin wall for 10cm thick SR4), plywood and exmesh, incredibly similar to Isoclad Securiclad, can upgrade up to FB6 ballistic), Burton say they can go up to SR5, Burton claim their Embassy cassette wall is tested to LPS1673 D300 (with ballistic options, model 1 D300 25mm 42kg 3mm+2mm steel, model 3 D300 + FB4 27m 67kg 3mm + 4mm steel, model 5 D300 + FB6 29mm 90kg 3mm + 6mm steel).
- Burton Biovault to E10 (they claim E20).
- Burton Orthrus up to F10 / G5, they say they can add ballistic up to FB7, RU score up to 80
- BastionWall up to SR5 / Multithreat Advanced G5 104kg/m2 / NPSA MTAS v1.0 49mm thick / G10 & MFES v2 (Multithreat Extreme) 144kg/m2
- Benweld modular walling up to G5 (Calder, also E10) / Sentinel Secure 12cm thick panels to NPSA MFES v1.0 & MTAS v1.0 resold by Modular Security Solutions, Hunterston to E10, Hinckley to D10 & Malvern to SR4, Heysham to C5, Bradwell to B10 & C3.
- Securiclad Protecticlad to SR5 / 100mm thick to NPSA MFES v1.0 & MTAS v1.0
- NPSA multithreat specifications
- Strongrooms
- Chubbsafe Moduleguard to EN1627 RC4 & EN1143 grade II-IV resold by Thornhill Security This is 16cm thick using steel trays filled with Chubb Borox XP. Moduleguard-SR T2 is 75mm thick and comes in T2 grades 1, III & V (60/136/175kg/m2).
- Hartmann Tresor HWS20 grade V resold by Thornhill Security as ‘nuclear bunkers’
- Muller Safe (available through Burton Safes) do the 2m x 2m x 3m Bunker modular saferoom up to EN1143 grade 5 and FB7.
- Gunnebo Centurion LW-SR grade V resold by Thornhill Security Panels are made of steel, wood and concrete, 80mm thick, 75kg/m2.
- Burton Cerberus up to grade XIII CDEX 27-415mm thick & 100-1,215kg/m2 RU score 50-4,500.
- Fichet Bauche Modular Vault to UL class M and 1 (3″ thick) for 15 and 30 minutes delay. Fichet Bauche fill panels with their ‘CHD’ steel fibres (grade 1) or DRA-Aggamix (grade M), and Tordbar. These were designed against torches and carbide core drills but not thermic lances or diamond core drills. Newer versions use their Gradium composite and can be specified against diamond core drills.
- Kaso supply EH series prefab strongrooms from grade II (76mm, 90kg/m2) to XIIEXCD (250mm, 780kg/m2).
- Doruk Safe supply modular strongroom panels from grade V (100mm) to XI (300mm).
- Robur Safe supply modular strongrooms from grade III to XI EXCD.
- Secure enclosures
- The Panic Room Company sell inbuild modular nuclear shelters and panic rooms using either proprietary panels or their own fabricated steel for the high net worth basement market.


MoD
- MoD’s JS440 Chapter 5 Section II on secure rooms says the lightweight alternative to 4″ brick (SR1-SR2) is a stud wall faced with a sandwich of 18mm plywood, 2073F (3mm x 4.4mm diamond exmesh) and plasterboard, for 9″ brick (SR2-SR3) the alternative is this sandwich both sides of the studs, and for 14″ brick (SR3-SR4) it is the dual sandwich doubled, so two sandwiches each side.
Police
Refuges
- Police advice on domestic violence sanctuary rooms is to:
- reinforce stud walls with 9mm plywood with no 4.5 security (if on attack side) screws on 100mm centres, although government say don’t use stud walls,
- if loft hatch outside room:
- internally line ceilings with 12mm plywood with no 4.5 60mm security screws on 100mm centres to protect from loft,
- replace loft hatch with 25mm plywood locked by a locking surface bolt on each corner.
Gun rooms
- Police advice on gun rooms is that:
- stone or thinner brickwork is SR3,
- 13″ brick is equivalent to the door equivalent to SR4 that they require although it won’t really be SR4 if fitted to unreinforced brickwork,
- for gun enclosures they recommend reinforcing normal ceilings or stud walls with 4mm thick exmesh,
- for armouries:
- walls should be:
- 10″ reinforced concrete,
- 13″ brickwork, or
- cavity wall of 11″ dense concrete block, brick or stone excluding the cavity with 4″ external leaf and 7″ internal leaf,
- failing which:
- reinforce the internal leaf by making it 11″ thick,
- thicken solid brickwork to 13″, or
- line with 2.3mm thick exmesh screwed on 300mm centres with mild steel washers and either resin anchors or manufacturer’s fittings
- so if your internal leaf is breeze block then you need to build a new 7″ wall inside as there is nothing worth thickening, although you might persuade police that the extra wall can be 4″ brick lined with 2.3mm exmesh as above.
- ceilings should be 6″ reinforced concrete or reinforced with 4.5mm thick exmesh folded and bolted to walls;
- floors ditto, or if timber reinforced with 3mm steel floor screwed with 10 gauge screws 60mm into joists at 300mm centres or reinforced with 2.3mm thick exmesh bolted to walls and covered with a second layer of floorboards screwed with 10 gauge screws 60mm into joists at 300mm centres.
- walls should be:
NPSA Safer Area
- This counter terror VIP standard is really just guidance at Annex A.4 giving examples of delay times from reinforcements against a LPS1673 style toolset (eg sledgehammer and axe) for 50x100mm wood stud walls with 40cm centres. 5x50mm wood screws are recommended at 30mm centres.
- 7 minutes from 18mm structural hardwood plywood on protected face, shuttering plywood on attack face and 2 x 40mm polyurethane acoustic board inside (at least 2-5 minutes of the delay comes from the insulation board, about 13s from the shuttering plywood and at least 1 minute from the hardwood ply). Other tests found upgrading from shuttering to hardwood adds 4 minutes delay, suggesting it’s the hardwood rather than insulation that counts. Another test found the insulation adds 2.5 minutes delay.
- 7 minutes from bullet board covered by 2mm stainless steel on attack face.
- 5 minutes from 2mm stainless steel on attack face.
- 5 minutes from 12mm bullet board on attack face and 18mm shuttering plywood on protected face.
- 4-5 minutes from foam cored carbon fibre board on attack face.
- 4-5 minutes from 2mm zinc coated mild steel on attack face.
- 3 minutes from 18mmn shuttering plywood each face, and 2 x 40mm polyurethane acoustic board, 70mm PIR or expanded polystyrene board inside.
- 1-1.5 minutes from 18mm hardwood ply on attack face.
Ballistic
Concealment
- Before you worry about materials, try to prevent a line of sight, then try to prevent a 90 degree line of fire.
- Normally the last thing you want is trees blocking your view of intruders approaching or of sharpshooters in the distance. But against direct fire, concealment of openings by trees can be a good thing.

- Doors may need a non-ballistic visual shielding wall for low level protection, or a hardened foyer for medium protection (backed up by a predetonation screen if rocket launchers are a risk).
- Walls should continue beyond the roof as a parapet if it is necessary to hide rooflights from sightlines.
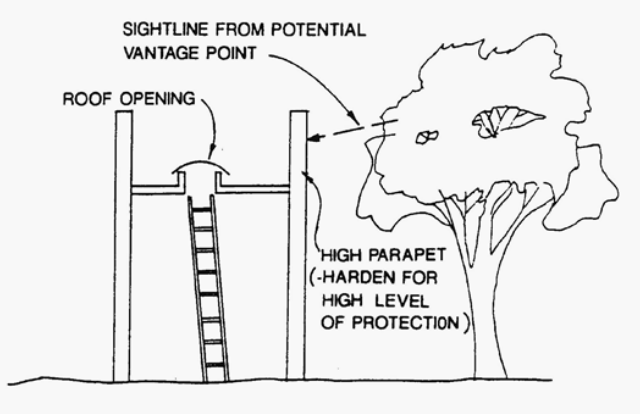
- Forcing a shooter to come in at a 60 degree oblique angle doubles the thickness of material they have to get through. A 75 degree angle quadruples it.

Materials
- Steel is not the only metal used for bullet resistance. Aluminium and titanium are possibilities. With any metal, the challenge is to harden it to stop armour piercing rounds without making it so brittle that it fractures. Sometimes, like tank armour, it simply has to be done with a sandwich of hard layers to decelerate the bullet and soft layers to catch it.
- Ballistic materials you could explore include tungsten carbide plates, ceramic (eg aluminium oxide or boron carbide, perhaps backed with GRP), steel balls in polymer, or aramid in styrene and butadiene matrix, or glass fibre reinforced PVA.
- FEMA say that to stop a rifle needs 6.5” reinforced concrete, 8” brick or 1” mild steel. The military use Qinetiq LAST made of polyethylene, metal or ceramic for aircraft.
- Only reinforced concrete or steel is normally used to stop machine guns.
- Lining concrete with steel as an anti spall layer was found in one experiment to add only the equivalent of 3.06 times as much thickness of concrete as the steel thickness, so is a heavy expensive way of building but sometimes the only option for retrofit. It works better for slow rounds.
Specifications
- Ballistic wall specifications include:
- for low threat weapons (.44 magnum, BSI G2, EN1063 BR4, NIJ IIIA):
- 4” brick or grouted hollow concrete blocks,
- 2.5” 3,000 PSI reinforced concrete,
- 8mm mild steel, or
- 6mm armoured steel,
- for medium threat weapons (rifles, BSI R2, EN1063 BR6, NIJ III, UL752 5):
- 8” brick or grouted hollow concrete blocks,
- 4” 3,000 PSI reinforced concrete,
- 14mm mild steel, or
- 11mm armoured steel,
- for high threat weapons (AP rifles, EN1063 BR7, NIJ IV, UL752 3):
- 8” brick or grouted hollow concrete blocks,
- 6.5” 3,000 PSI reinforced concrete,
- 21mm mild steel, or
- 18mm armoured steel,
- for very high threat weapons (.50 calibre, UL752 10):
- 4” solid concrete block face with 0.75” rigid urethane interlayer backed by 8” grouted hollow concrete blocks,
- two layers of 6” grouted hollow concrete blocks with insulated cavity,
- 30” brick or grouted hollow concrete blocks,
- 12” 5,000 PSI or 22” 3,000 PSI reinforced concrete,
- 32mm mild steel, or
- 25mm armoured steel.
- RPGs are also treated as very high threat level but have their own specifications of:
- 22” rolled homogenous armour,
- 28” mild steel,
- 40” concrete, or
- 46” brick.
- for low threat weapons (.44 magnum, BSI G2, EN1063 BR4, NIJ IIIA):
- Against direct fire, the standards are in the 2017 US DoD Design to Resist Direct Fire Weapon Effects. US UFC Table C-14 recommends:
- You either stick with your masonry wall or use 24” reinforced concrete.
- Use at least a steel decked 4.5” concrete roof or ideally 24” lightly reinforced concrete.
- Retrofitting can be done to walls with 21mm steel plate and to roofs with fibreglass.
- Either reduce spalling through windows with 4 mil window film or try to stop it with anywhere up to 55mm polycarbonate glass.
- Make do with a hollow steel door and hope the shooter cannot see where to shoot, or try to stop it with armoured steel up to 17mm and ideally shield it with 24” reinforced concrete.
- NPSA have a confidential standard called MTAS against marauding terrorists. This includes Ballistic Forced Entry Standard (‘BFES’) rated for 30s to 10 mins, which takes account of a single shooter softening up security products with bullets (from handgun, rifle or shotgun before manual attack by one low (knife, handgun or shotgun, followed by fire extinguisher) or moderately (rifle, pipe bomb or PBIED, followed by basic tools) skilled terrorist or two highly skilled (plastic explosives, followed by all hand tools or battery tools) or expert (MoE gear) terrorists.
RPGs
- Against RPGs you may need a sacrificial predetonation screen.
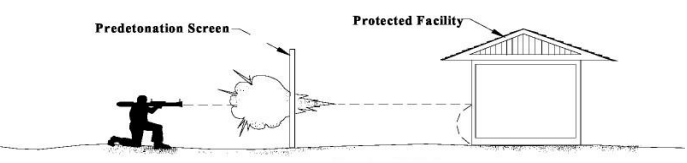
- One way of building predetonation screens against RPGs is to place the screen at a standoff, with the building reinforced by an outer layer of sand. You can mix and match standoff distance , concrete thickness and sand depth. For example, a 4″ wall at 4′ needs 26″ of sand, whereas if you can push out the standoff to 18′ or increase the concrete to 28″ you don’t need any sand.
- Ideally you reduce the thickness further by lining the inside with 0.5″ polythylene as a spall plate. That for example reduces the sand depth to 24″ at 4′ for 4″ concrete, or reduces standoff to 16′ for no sand with 4″ concrete.


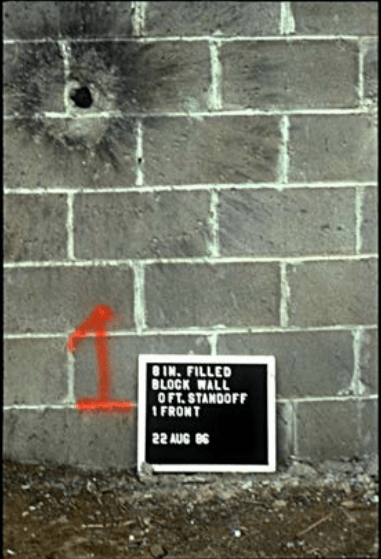
- Shaped charge RPGs burn straight through concrete walls, which can be easily repaired, although whatever or whoever is inside will be at risk.
Indirect fire
- If indirect fire is the concern then you can reflect risk with:
- walls of anything between 6” steel stud wall with 12” centres and brick skin through to 56” reinforced concrete, or
- you could retrofit walls with anything from a 4” lightly reinforced concrete backing wall to a 2” steel plate on steel studs.
- Windows ideally removed or replaced with 13-21mm laminated glass.
- Doors protected by foyer.
- Roofs can be from sacrificial roofs through to 12” reinforced concrete.
Domestic threat levels
- Domestic threats in the UK will normally be limited to low threat weapons so masonry usually suffices (although lining with 3mm steel is ideal), whereas saferooms are more likely to have no foundation for masonry so you would use 6mm armoured steel, or 8mm mild steel or 8mm fibreglass which is easier to work with.
- If you harden against low threat guns you probably might as well harden against medium threat guns, as it only needs an extra 1/16” steel, 1/8” fibreglass or ½” reinforced concrete to go from the rating for a .38 super to the rating for a .44 magnum.
- If you have 3,000PSI reinforced concrete you probably have at least 4” of it, which is rated against high threat such as a rifle, although to stop an AP round needs 6.5” and to stop a machine gun you need 12” (or 8” with 16mm rebar in 6” squares and a 10 gauge (3.2mm) steel face plate, or 6” with no5 rebar on 6” centres faced both sides with 10 gauge steel plate).
- If you have brickwork or grouted concrete blocks you probably have 4” of it, which is rated against medium threat such as a .44 magnum, although to stop a rifle there are schools of thought:
- you may only need 6” grouted concrete blocks to stop a rifle and 8” if an AP round, or
- for any round you would need:
- 8” hollow concrete blocks lined with 3mm steel, or
- 8” grouted concrete blocks rebarred with no 5 at 8” centres and faced both sides with 10 gauge (3.1mm) steel plate, or
- 4” brick lined with 9.5mm steel.
- You would never use brick or concrete blocks to stop a machine gun (unless exceptionally you used 12” grouted concrete blocks with 16mm rebar in every hole and a 10 gauge (3.1mm) steel face plate, or 8” with steel lining as well).
- This means a typical house wall with brick facing can stop a .44 magnum, but whether it can stop a rifle depends on what the inner layer is made of, it might be brick or useless aerated block. Most home walls are OK ballistically unless someone turns up with a machine gun; it is openings like doors and windows that are the problem.
- If you use lining, rather than the wall itself, to stop the bullet, fibreglass is an option and 8mm should stop low threat guns, 14mm medium threat and 28mm high threat. The other option is steel plate, of which 6mm should stop low threat, 8mm medium threat, 14mm high threat and 21mm very high threat.
- Due to weight and cost of rebuilding, you normally want your wall to stop the bullet or at least slow it and let a lining catch it.
- Roughly speaking, if you have a 4” brick wall it needs lining with:
- 11mm armoured steel or a separate 9.5” reinforced concrete wall (ideally with 10 gauge (3.1mm) steel attack face plate to blunt the bullet) to stop a machine gun, or
- 8mm armoured steel (or theoretically 1.5” reinforced concrete – in reality rebars must not be too close to the surface of concrete, so you would use steel fibre cement concrete) if you are only worried about rifles.
Blast
Mechanics
- To harden against blasts needs mass, ductility, resistance to rebound and uplift, ties, load carrying redundancy and continuous load paths. Reinforced concrete is the go-to material as concrete resists shear, torsion and compression, benefits from continuity and inertia and soaks up blast by cracking instead of rebounding, while steel resists tension, stretches with long pulses and holds concrete together.
- Blast barriers such as sandbags only stop fragments and reflected pressure, so your building will still have to take the pounding of incident pressure.
- If your concern is direct hits from non nuclear munitions and you can afford a Bond villain lair then there are things you can do with concrete bunkers with walls 1.5-10m thick especially if hidden under a burster slab or rock bubble covered by a deflection grid, although even then you are in trouble if the missile gets a perpendicular hit and/or is much faster than traditional 250m/s sort of speeds.
Specifications
- The US NCMA have an article on wall blast resistance.

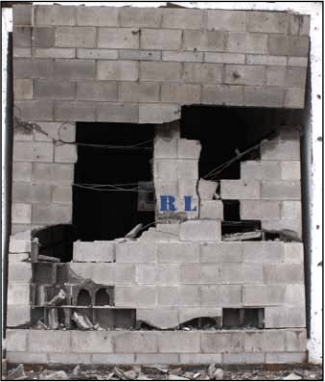
- Further reading on physical security includes the 2008 US DoD Security Engineering Facilities Planning Manual, the 2016 US DoD criteria on Safe Havens, the 2020 US DoD criteria Design to Resist Forced Entry (replacing the 1993 Design Guidelines for Physical Security of Facilities).
- The US UFC Table C-14 recommends for blast:
- 18” reinforced concrete is their highest wall specification for 25kg blast resistance, with 12” being the highest for roofs. The strongest blast glazing they suggest is 2” polycarbonate which matches with lightly reinforced 6” concrete and a 100PSI door.
- Retrofitting for 25kg TNT can be done for walls with catcher systems or reinforced concrete backer walls, or ideally a steel stud wall which also stops intruders after a blast; windows can be replaced with anything from 13mm three-ply laminated glass to 50mm polycarbonate; doors can be replaced with hollow steel, ideally reinforced; roofs can be given an extra roof of up to 9” reinforced concrete, or slabs on steel deck for lower security.
- The 2020 USA DoD Minimum Anti Terrorism Standards for Buildings suggests 5% thickness vertical wall reinforcement at maximum four feet centres, and their minimum terror standard adds 0.025% horizontal reinforcement, ie a 10” concrete wall should have the equivalent of 0.5” rebars.
- Concrete walls should be revetted with a yard thickness of soil against fragmentation. However this is a very low standard and its matching glazing standard only requires 6mm laminated glass or polycarbonate or fibreglass to stop fragments.
- Doors need only be outward opening and seated.
- Whereas the normal standard for concrete reinforcement is 1% of cross section, for blast protection 1.5-2.5% is needed.
- If 1kg TNT or hand grenades could be coming your way then go for:
- 4” concrete walls reinforced with no 3s at 12” centres.
- Windows should be minimised anyway but can be 19mm polycarbonate.
- Doors can be hollow steel in a 6” reinforced concrete foyer.
- Roofs can be 6” lightly reinforced concrete.
- There is also the 2007 1,943-page US DoD criteria for Structures to Resist the Effects of Accidental Explosions.
- You can protect against injuries from fragments down to 2.1m/kg0.33 by lining unreinforced masonry with steel or 8cm silicate blocks. Top get down to 1.7m/kg0.33 needs lining with concrete or concrete-filled wood-cement bricks.
- Stronger walls against blast are reinforced concrete panels, concrete cavity walls or concrete-filled wood-cement bricks. Blast resistant reinforced concrete should be at least 30MPa with low carbon steel of at most 40MPa yield strength for ductility.
- These are all generic specifications and what you need depends what you expect to explode and how far away. They are not products with blast ratings.
- Locate the building away from roads. Orient the building in compact shape such a square or circle to minimise roof span but it’s acceptable to stretch a square to be rectangular to reduce the elevation facing the likely blast such as a road . Site any extra buildings far to avoid reflections. Minimise height, ideally single story. Avoid internal corners. Avoid loose extras like canopies, rendering, tiles. Keep air con units etc off the roof, for blast resistance they should be at ground level, although it needs hardening more for manual attack.
- Design internal walls to resist whatever pressure you expect to leak through.
- Keep equipment at least 6″ off the inside of external walls as they will be smashed when the wall moves.
- Any opening apart from doors should not in total exceed 0.0066m2/m3. Windows are deprecated but can be blast resistant, the problem is they are a weak link in the chain when they tie to wall rebar even if wrapper round the reveal, even a window stronger than the wall will just risk the reveal.
- An example of rating is to resist 69kPa 20ms and 21kPa 100ms overpressure, which is safe at 30m for 1t TNT.
- Ensure two entry points at least 50′ apart for each utility for redundancy. Conduits should be the minimise size and blast valves used. HVAC should have flexible joints. Equipment on the wall should survive 300m/s2 acceleration and 1.5m/s velocity. Gas tightness should be at least 0.2dm3/3 at 150Pa. Wall sleeves should be hot galvanised, and if over 40mm need flange rings. Air intake ducts should take at least 20kN. Relief valves should have overpressure impulse under 10N for overpressure up to 40kPa and 3N for overpressure up to 300kPa, with leakage under 15cm3/2 at 150Pa and 10-dm3/s at 300kPa, flow resistance with 30cm straight duct under 95Pa at 54dm3/s and under 115Pa at 65dm3/s, and opening pressure 30-60Pa, they should be able to go on a 16cm duct flange and shouldn’t protrude more than 15cm from the wall or 13cm from the duct. Supply air valves should connect to a 16cm duct, and have flow resistance of 20-60Pa at 25dm3s, and velocity of 0.5m/2 at 1m at flow of 25dm3/s. Exhaust air valves should be able to go on a 16cm duct, with maximum leakage of 15cm3/s at 150Pa and withstand static overpressure of 20kPa each side. Sewer shut off valves should have maximum leakage of 15cm3/s at 150Pa. Cables should come through in multi cable transit.
Explosives for entry
- The US military specification for blast wall delays is:
- 1 minute from 4” 3,000PSI concrete with no 5 rebar each way on 5” centres,
- 1 minute from 12” grouted hollow concrete blocks with no 5 rebar on 8” centres,
- 2 minutes from 6” 3,000PSI concrete with no 4 rebars each way on 8” centres,
- 2 minutes from 8” 3,000PSI concrete with no 5 rebars each way on 6” centres,
- 2 minutes from 12” 3,000PSI concrete with no 6 rebars on 12” centres,
- 2 minutes from 18” 5,000PSI concrete with 5/16” exmesh on 3” centres,
- 3 minutes from 4” 6,000PSI concrete with no 5 rebar each way on 5” centres,
- 3 minutes from 12” 3,000PSI concrete with no 5 rebar each face on 6” centres,
- 3 minutes from 8” 6,500PSI fibrous concrete with no 5 rebar each way on 6” centres,
- 3 minutes from 8” grouted hollow concrete blocks with no8 rebar on 8” centres, plus 4” 6,500PSI fibrous concrete.
- The minimum USA military specification against explosive attack as a means of entry is 12” reinforced concrete for 1 minute delay. Unless you already have this it is rarely viable to retrofit reinforcement so you would almost certainly have to build a strongroom inside instead.
- NPSA have a confidential standard called MTAS against marauding terrorists. This includes Energetic Forced Entry Standard (‘EFES’) rated for 30s to 10 mins, which takes account of a single bomber softening up security products with a bomb (pipe, plastic or PBIED) before manual attack by one moderately skilled (pipe bomb or PBIED, followed by basic tools) or two highly skilled (plastic explosives, followed by all hand tools or battery tools) or expert (MoE gear) terrorists.
Domestic requirements
- A normal house brick wall can take 0.08MPa OR 11psi peak pressure from a bomb without damage, which is equivalent to ISO16933 SB1(A) (3kg TNT at 9m) or EXV25(A) (100kg TNT at 25m), and this can be trebled with blast resistant cement lining. 11PSI is like 108 tonnes pressing on an 18 feet square wall. At 33PSI it would crack but not collapse and would even take another blast without collapsing, although it would be more vulnerable to damage. Nuclear blasts are different as they last longer than the 0.1s that brick is protected by inertia, so 5 PSI from a nuke would demolish it and even just 1.7 PSI would require shoring and expensive repairs.
- Unreinforced masonry walls can handle blasts at scaled distances of up to about 3m/kg0.33. In comparison, ceiling and roofs will have already come down at about 5m/kg0.33, standard wooden doors at 8m/kg0.33 and 3mm annealed glass at 30m/mg0.33 with severe injuries from glass at 18m/kg0.33.
- Think about how much blast you can handle.
- If you want windows then there is not much point having walls stronger than 6″ reinforced concrete, and if you want them to open there is not much point having walls stronger than 4″ reinforced concrete, due to limited availability of window frames for thick polycarbonate. However, you could choose to have stronger walls to save the structure and accept that windows will blow in and have to be boarded up somehow, but remember this risks your internal walls. If you do not have at least 4″ reinforced concrete then you do not have any real blast resistance to boast of.
- A problem with domestic walls is they have windows so lots of openings whereas blast strength largely depends on compression. A wall holding the weight of floors can perform several times better than one only holdings its own weight – see the 1971 US DoC Strength of masonry walls under compressive and transverse loads.
- You can retrofit brick walls with geotextiles like polypropylene to try to catch fragments. Another option is spraying on polyurea. Hamilston Erskine’s Tecdur range includes Blast Wall retrofit panel incorporating plastic sheet to catch masonry, reinforced with fabric straps.